Welcome to The Clock
Welcome to The Clock 3!
Throughout this manual you’ll find information to help you get the most out of an app designed from the ground up with your productivity in mind. The Clock is a great way to keep track of the time of all your customers, subcontractors, family members,… around the world. To have a quick look on a calendar, plan meetings and more. We’re glad to have you with us!
Getting Started
The first time The Clock is launched, an additional time item will appear in your menu bar.
NOTE
If you have a lot of items in your menu bar, the system may hide The Clock item. Make sure that there is enough space left for The Clock item to be displayed.

Click on The Clock in the menu bar, the window will open.
NOTE
The Clock icon will not appear in your Dock. You have the option to display The Clock icon in the Dock from the Preferences.
Add your first world clock
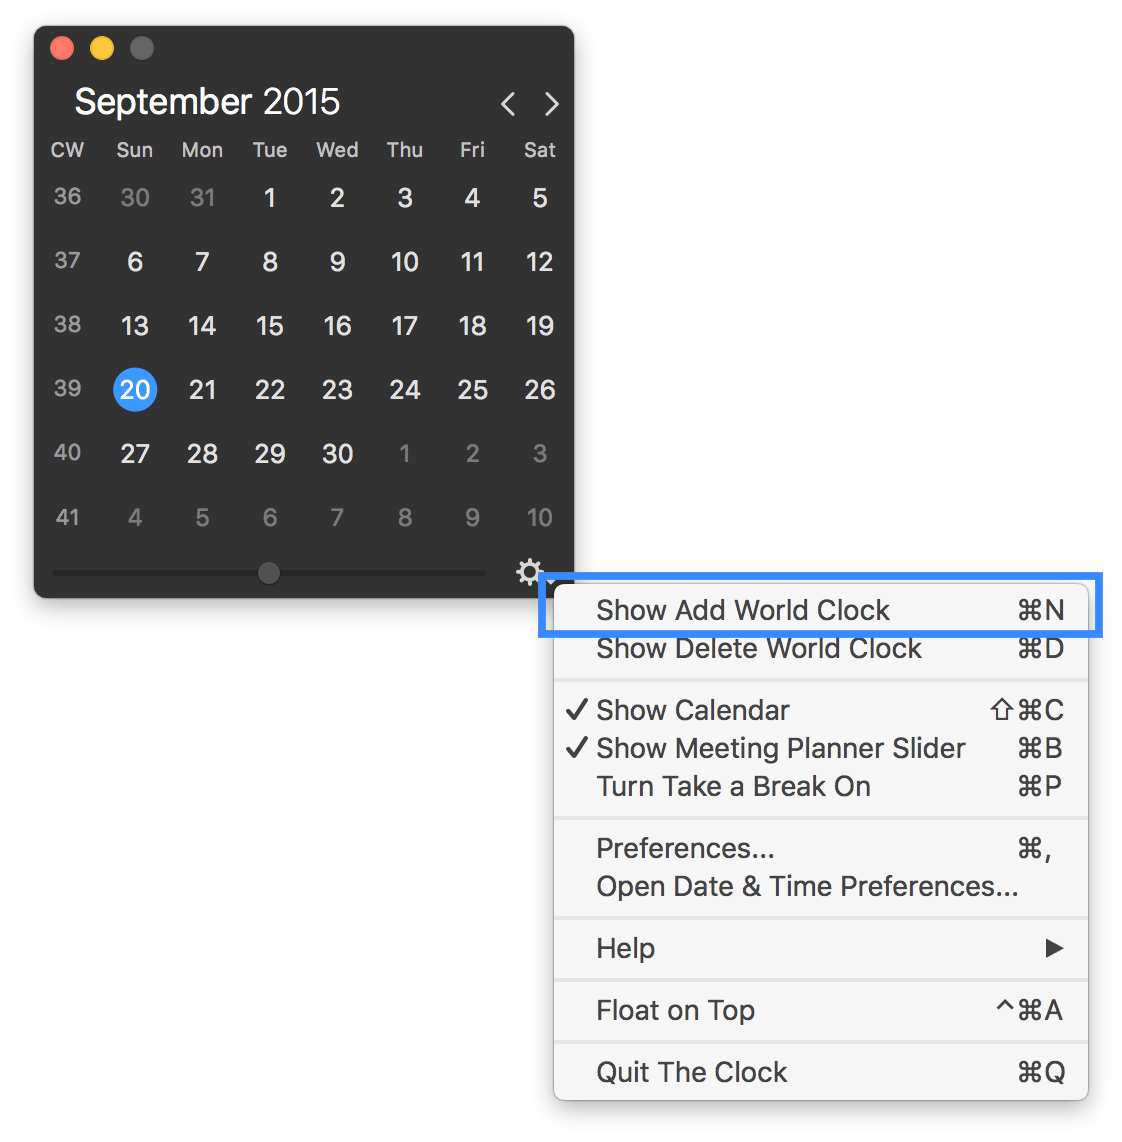
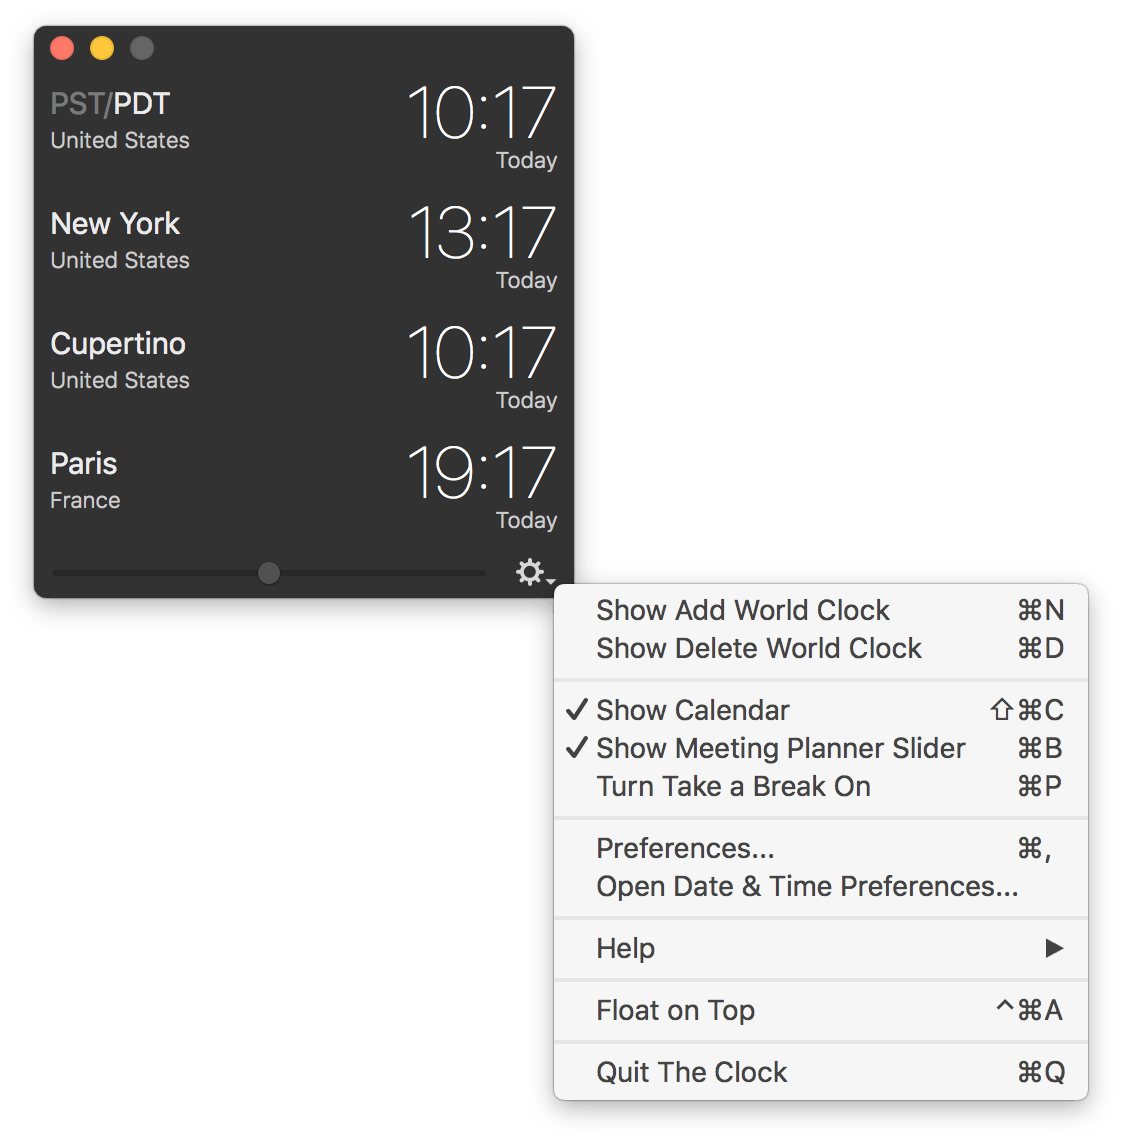
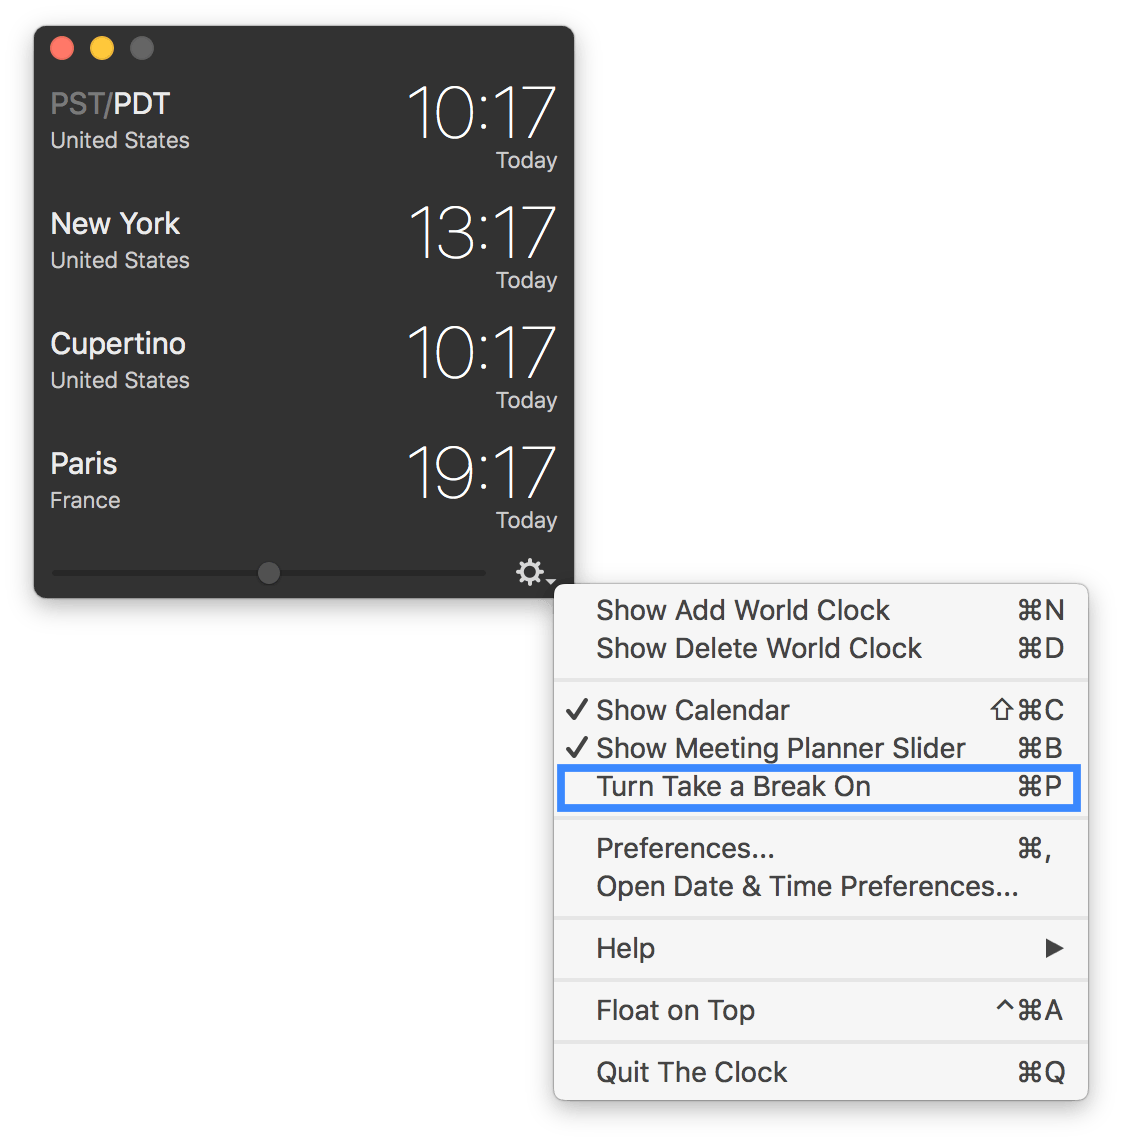
Click on the gear icon to access the menu. Then select Show Add World Clock.
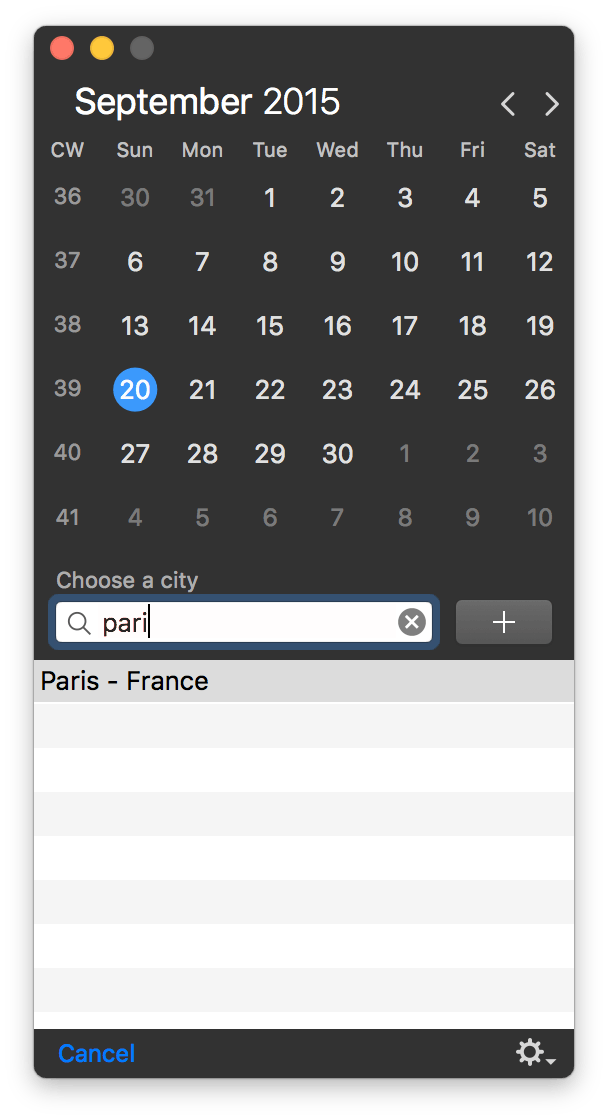
Choose a city that you would like to add. Then click the + button, or return key.

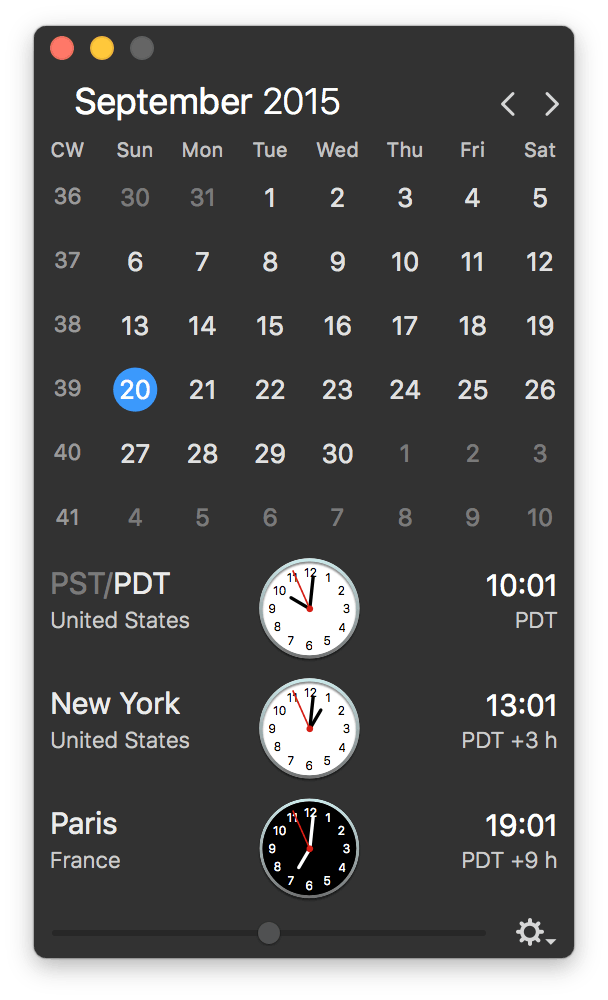
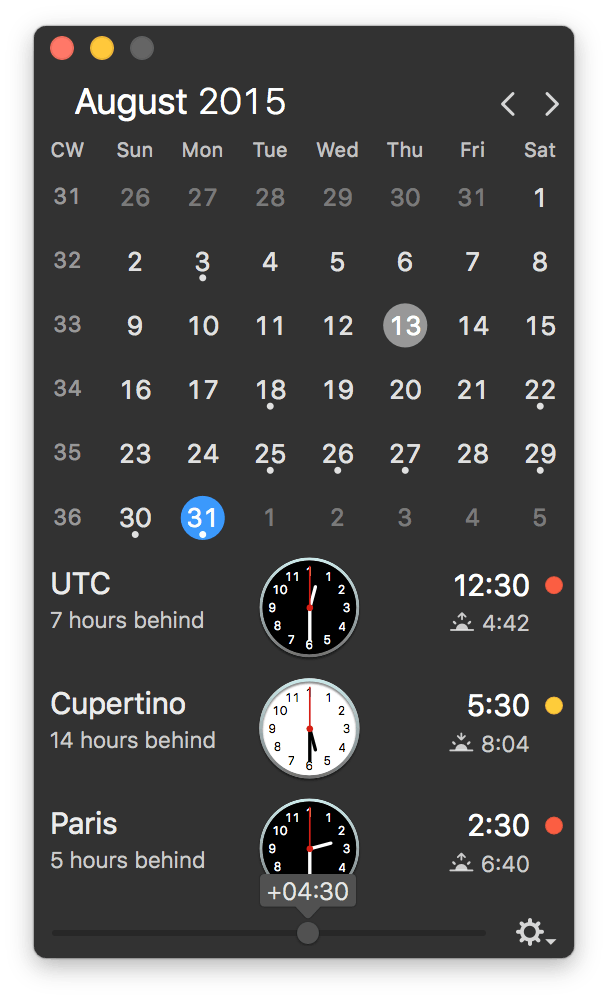
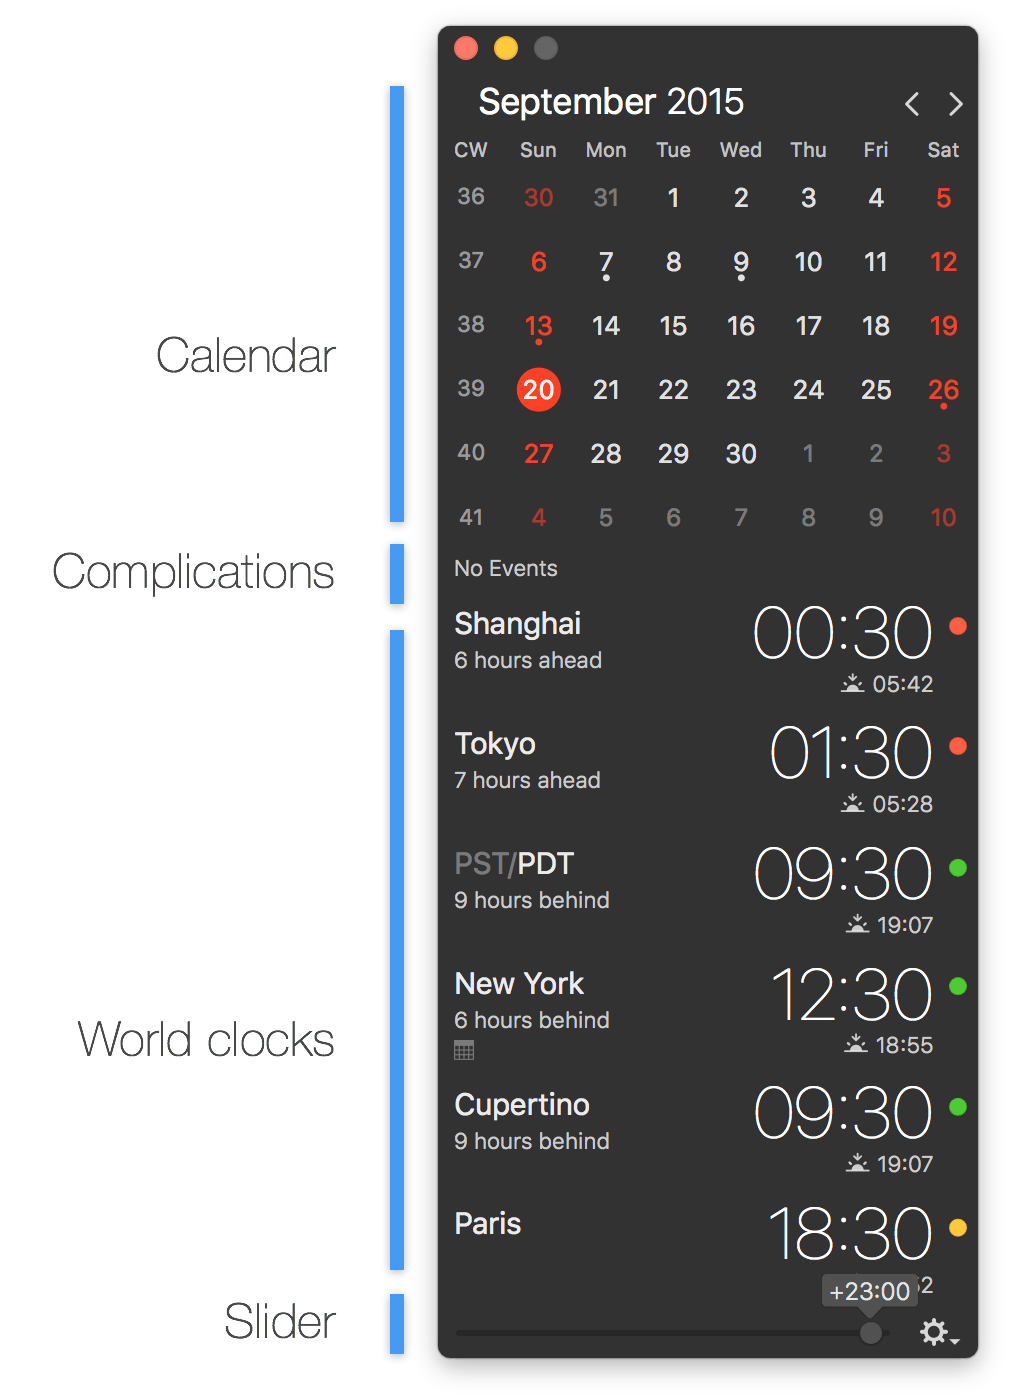
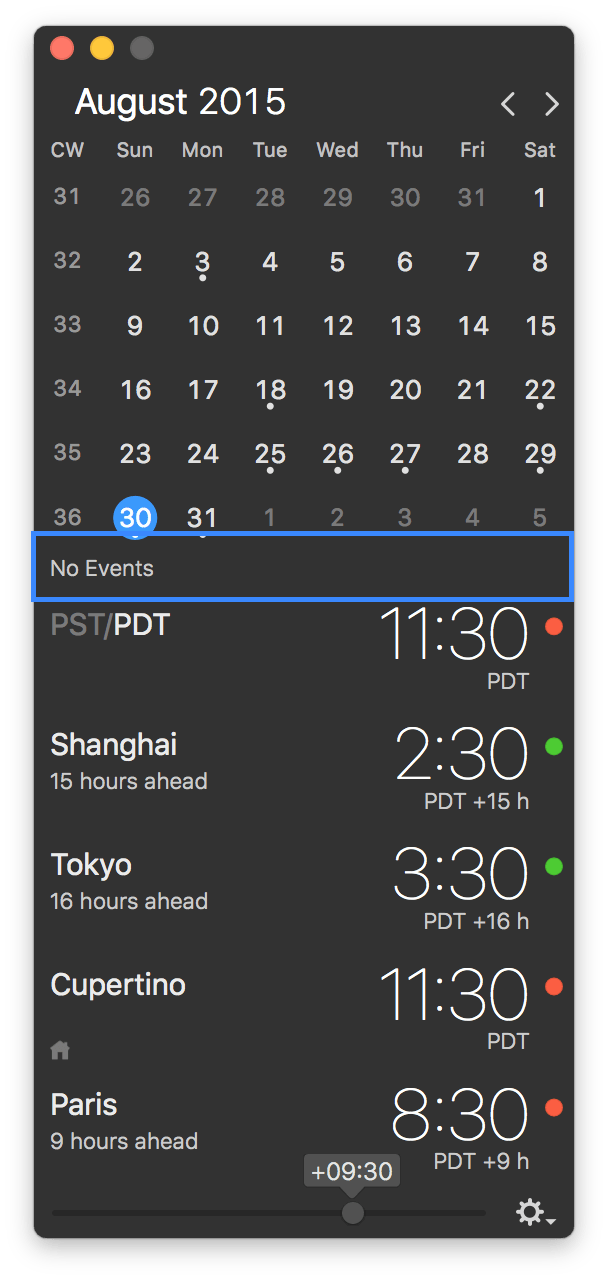
The Clock window
The Clock window is composed of 3 parts. The calendar, the world clocks, and the toolbar.
NOTE
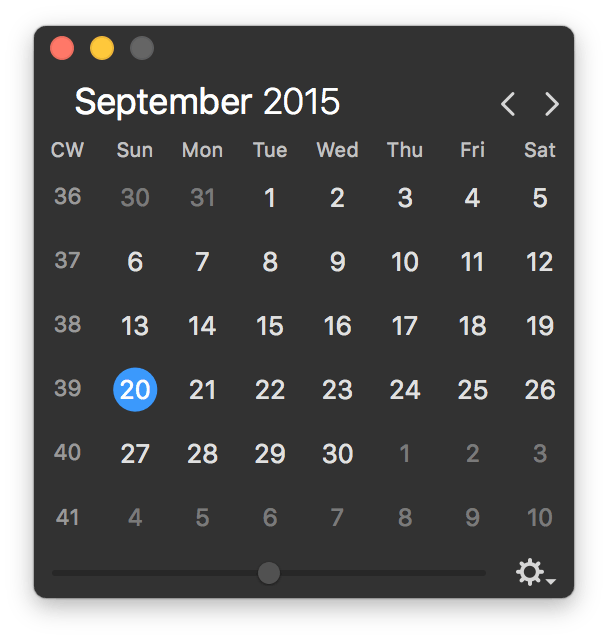
If you wish to hide the calendar, this can be done from the menu by clicking the gear icon.
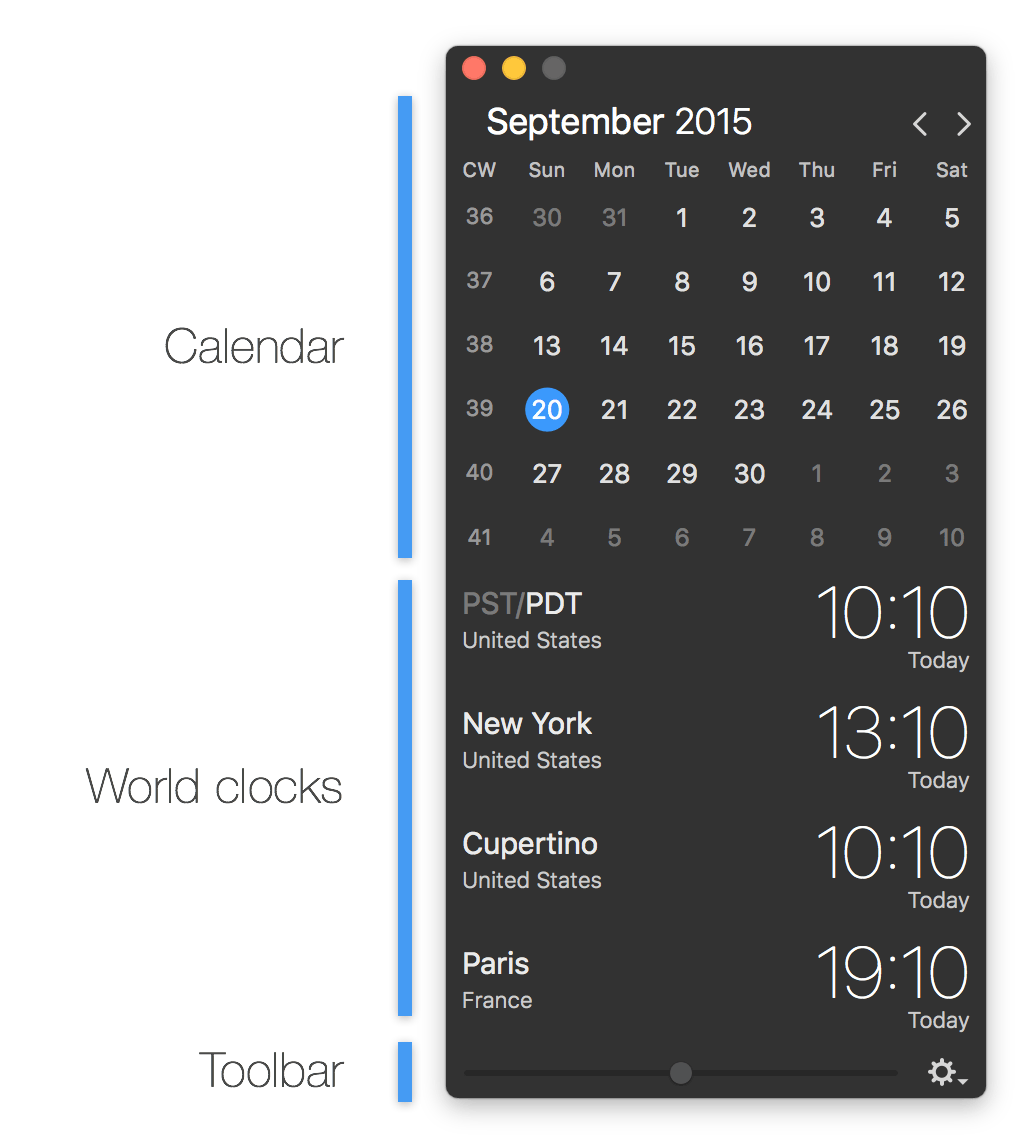
The toolbar is composed of 1 button. The gear button to access The Clock menu.
It is there that the Meeting Planner slider is displayed.
The World Clocks
The world clock feature in The Clock is quite powerful, with plenty of options to suit your needs.
| Add a new world clock | Complications |
| Remove a world clock | Time format |
| Rearrange the world clocks | World Clock Preferences |
| Window Resizing | Rename a city |
Add a new world clock
Click on the gear icon to access the menu. Then select Show Add World Clock.
SHORTCUTS
⌘N : Show/Hide the add cities panel.
Choose a city that you would like to add. Then click the + button, return key or double click on the city or your choice.
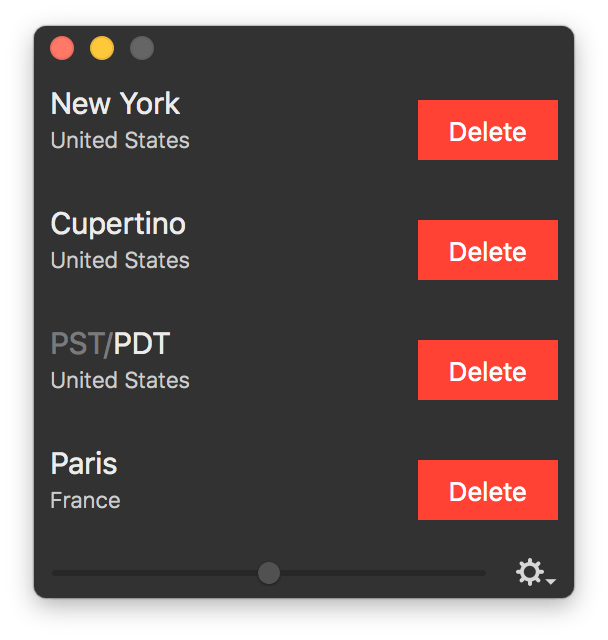
Remove a world clock
Click on the gear icon to access the menu. Then select Show Delete World Clock.
SHORTCUTS
⌘D : Show/Hide the delete mode.
Rearrange the world clocks
Select a world clock and drag & drop it in the desired place.
Window Resizing
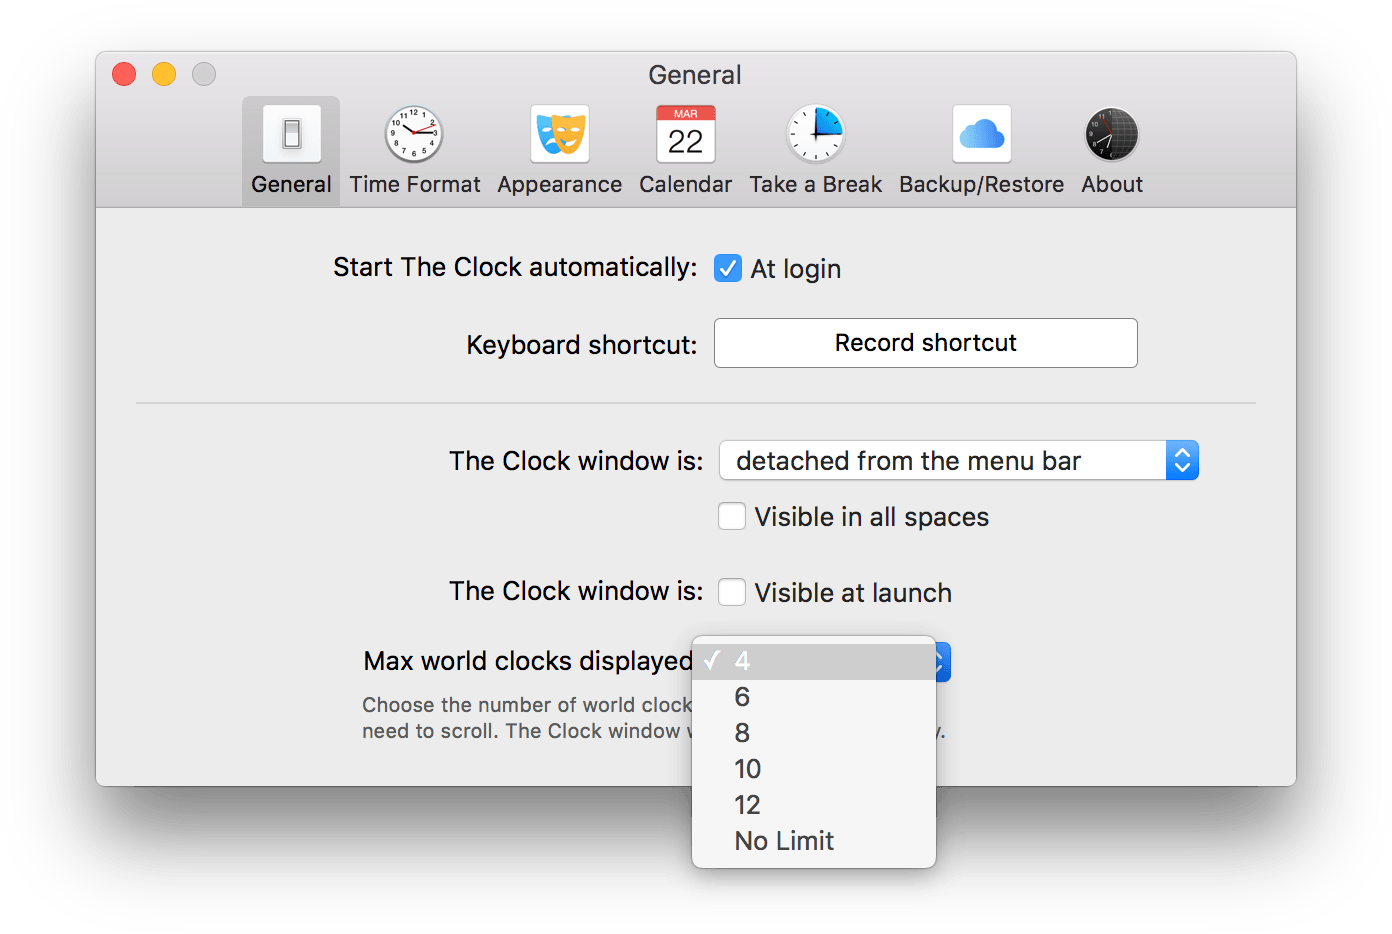
By default The Clock 3 automatically resize the window as per the number of world clocks and the size of your screen.
You adjust the maximum window height by changing the number of world clocks that you would like to see. Go to the preferences to define this number.
If you define a number of world clocks which is less than the number of world clocks that you have added, then you can scroll vertically to see the hidden ones.
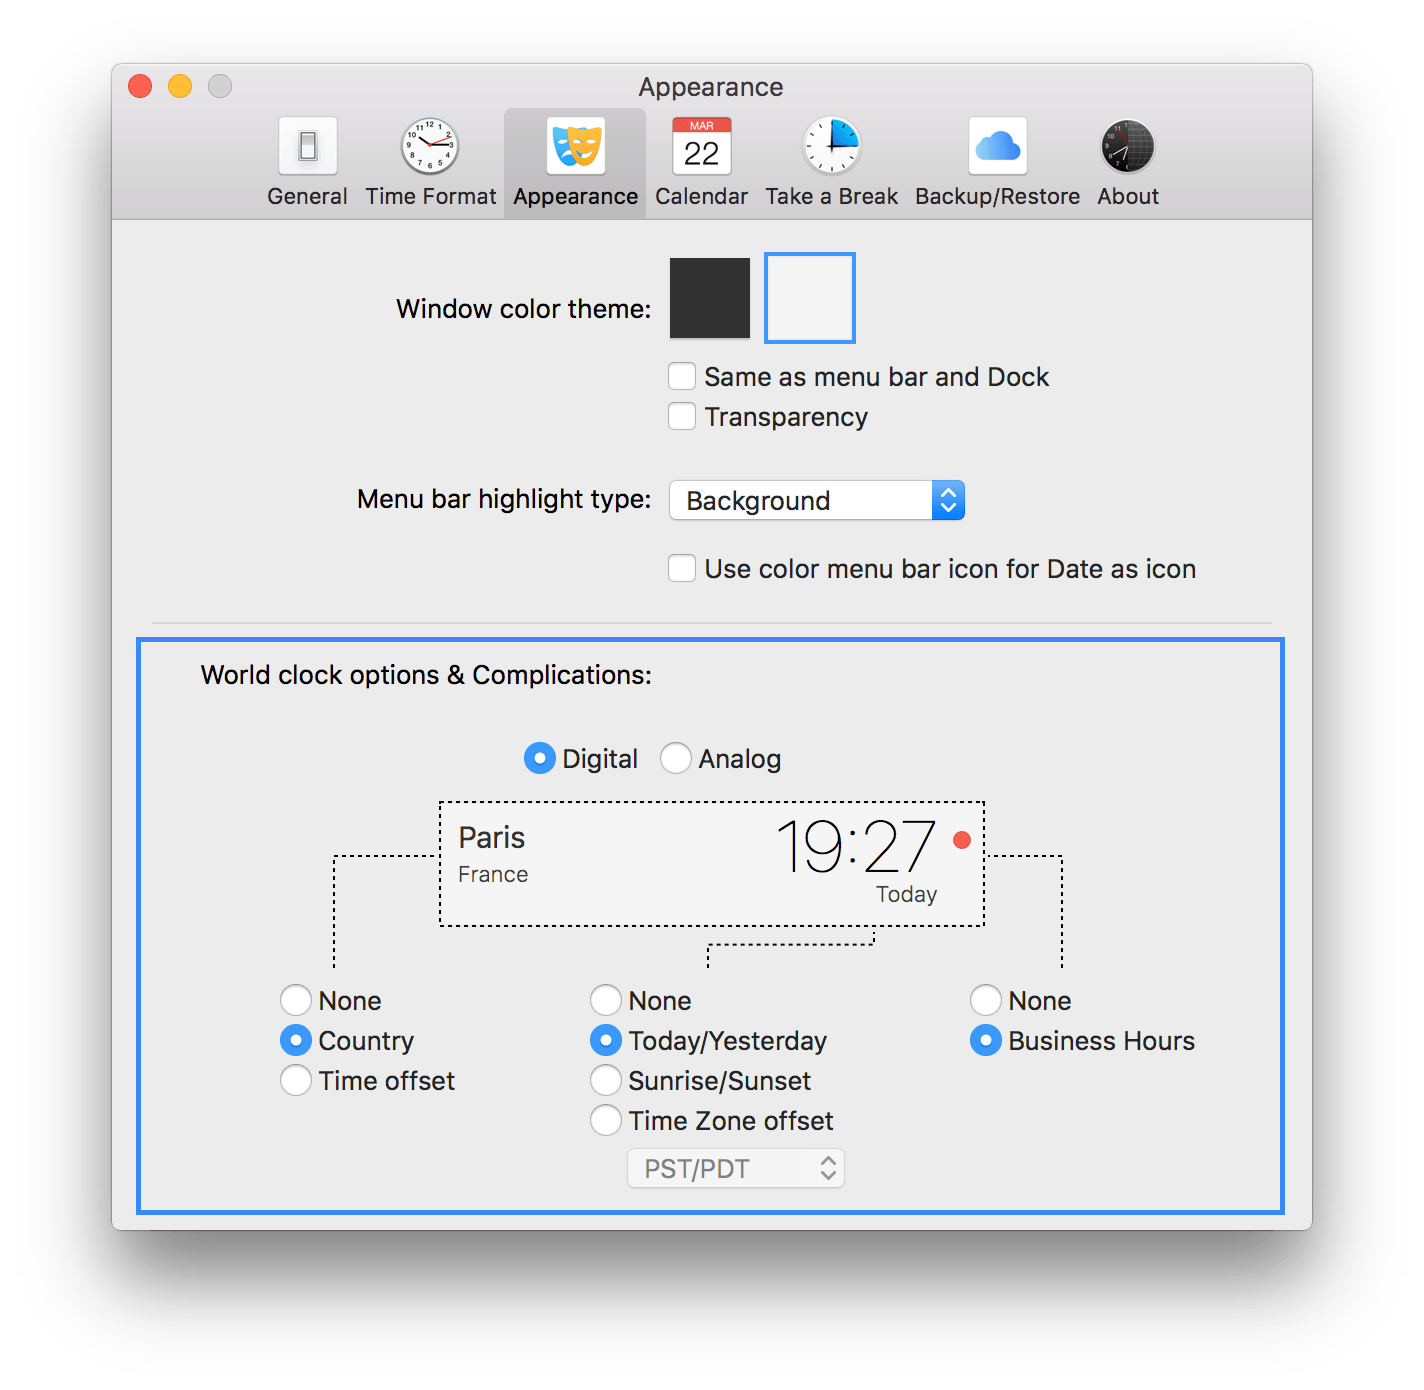
Complications
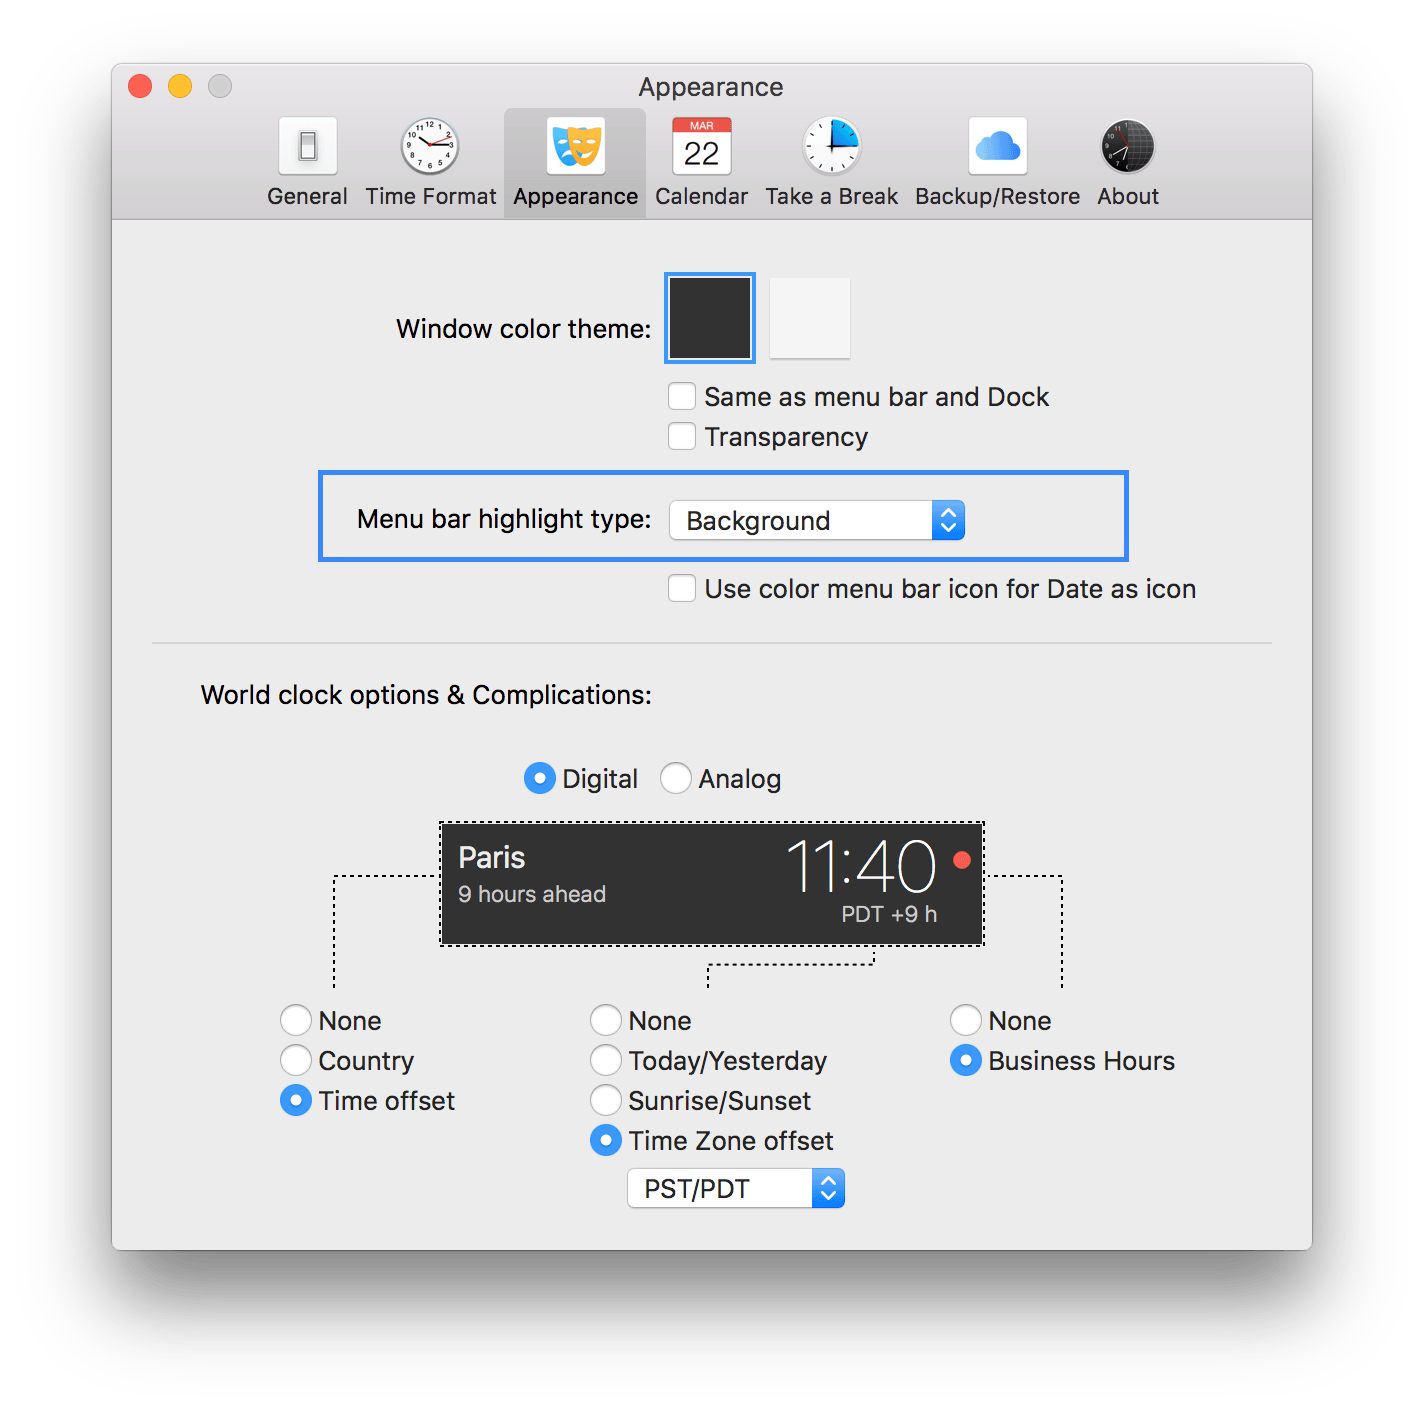
The Clock lets you customize the world clock displayed information. This customization is done by adding or removing Complications. From the Preferences from the tab Appearance.
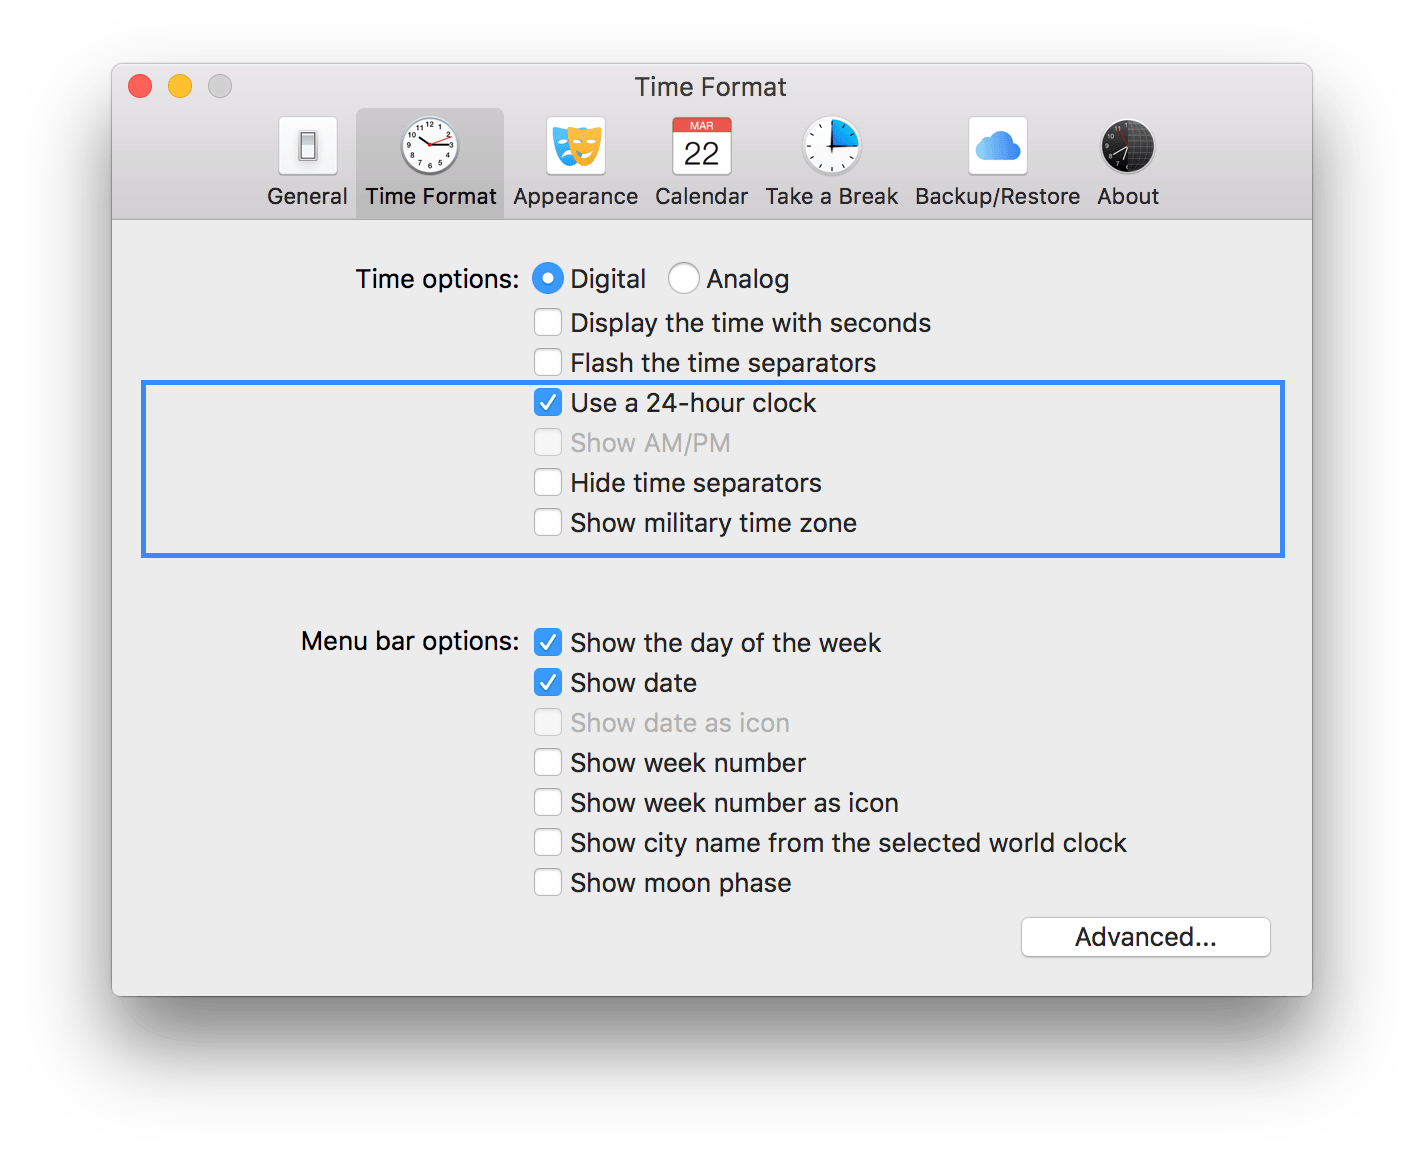
Time format
You can modify the time format for all your world clocks from the Preferences from the tab Time Format.
You can fine tune the format of a specific world clock from the World Clock Preferences. World Clock Preferences is describe below.
World Clock Preferences
You can further customize information of a specific world clock by accessing the world clock preferences. To access a world clock preferences, right click on a world clock.
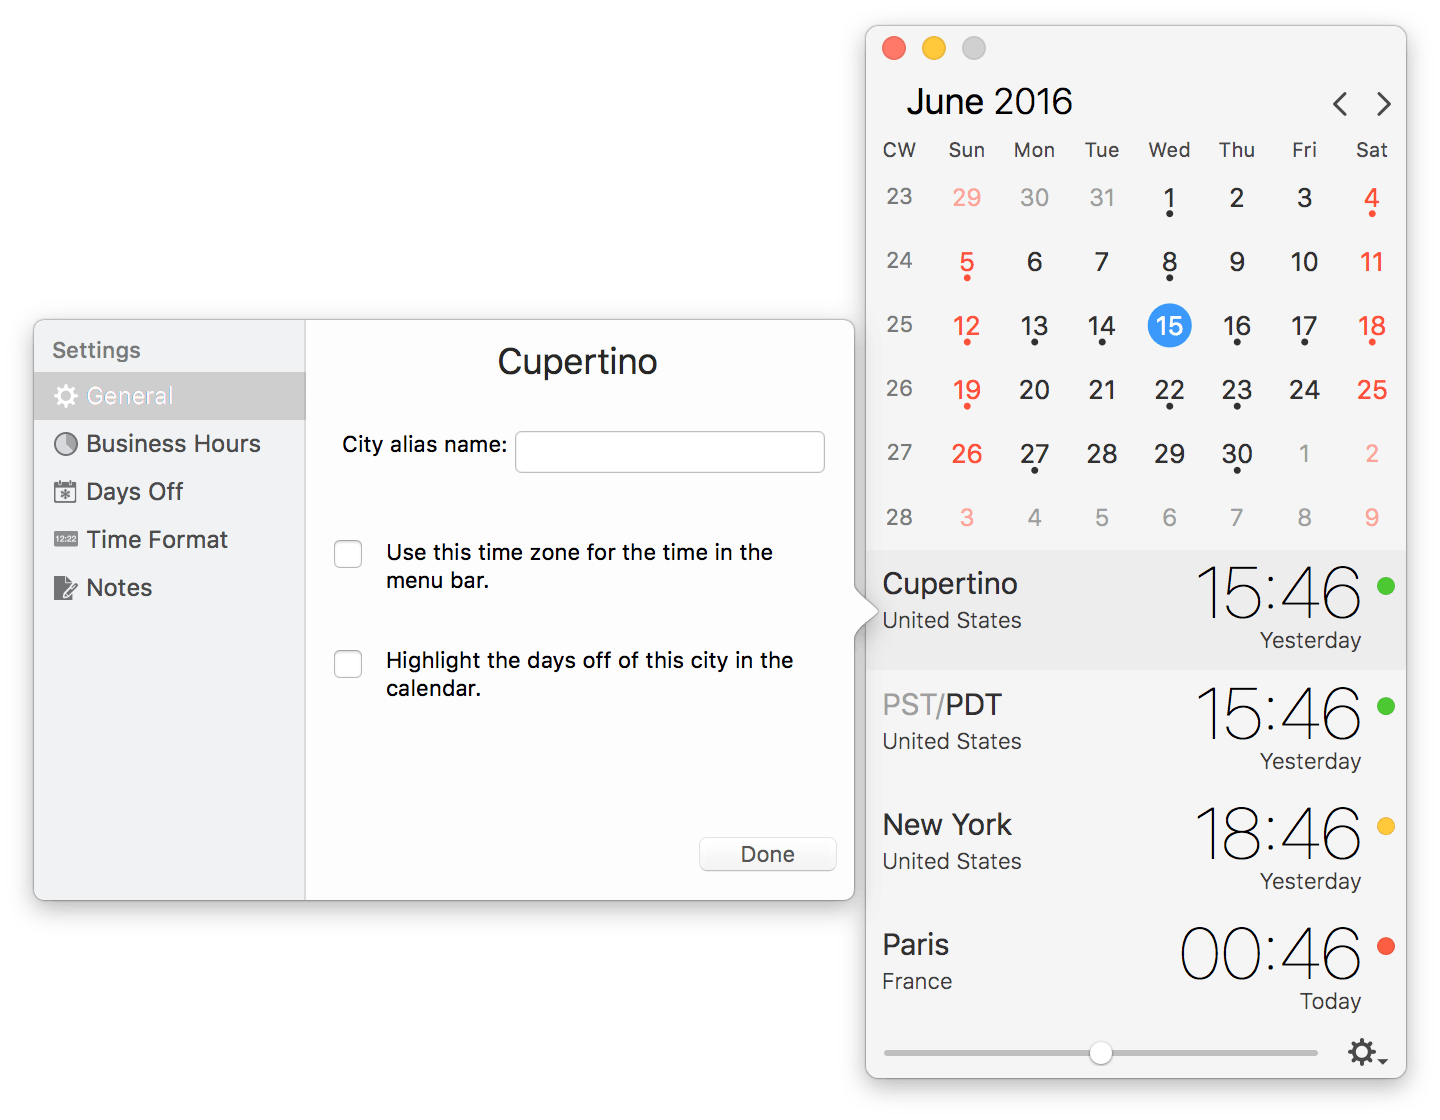
From there you can:
- Rename a city.
- Use this world clock time zone in the menu bar.
- Highlight the week-end and holidays for this city in the calendar.
- Define the working hours of your contact.
- Add/Remove holidays of your contact.
- Define a custom Time Format for this world clock.
- Keep some Notes related to your world clock.
NOTE
The time zone cities (PST/PDT, EST/EDT…) cannot be renamed.
Rename a city
To rename a city please refer to the previous section.
The Calendar
The Clock provide a quick and easy access to a calendar. Very convenient if you want to quickly check a date for a meeting or your next holidays.
| Overview | Settings |
| Navigation | Select a date |
| Enter/Remove Holidays | Select a Date for Meeting Planner |
| Highlight Days off | Show the calendar events |
Overview
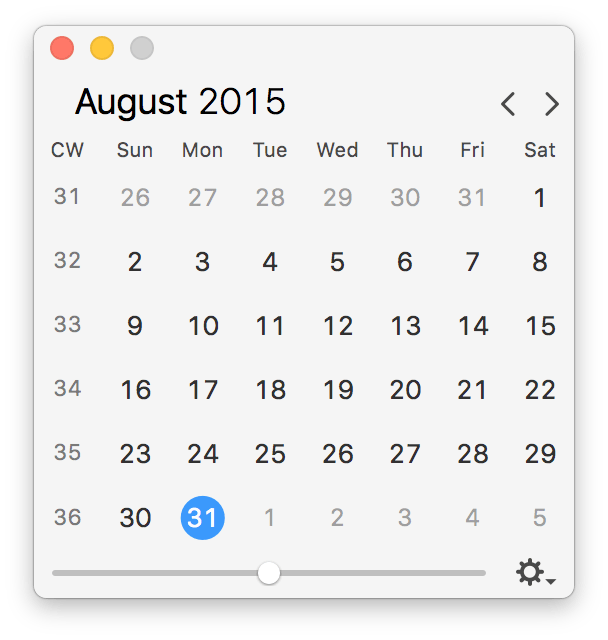
The calendar is composed of 2 parts:
- At the top, the month, week days and navigation buttons.
- At the bottom, the days and week numbers.
The current day is highlighted (blue on the picture above).
NOTE
The calendar can, if you wish, sync with Calendar.app, the system calendar.
Navigation
On the top part of the Calendar you will find two arrow buttons.
To navigate from one month to another, simply click on the arrows.
To go back to the current month, simply click on the month label.
Or use the Trackpad and swipe left/right. Double tap the trackpad to go back to the current month.
SHORTCUT
⌘T : Go back to current month.
Left/Right key : Go to previous/next month.
Up/Down key : Go to previous quarter/next quarter.
⌘⇧T : Go to Date panel.
Settings
From the Preferences, from the Calendar tab you can modify the calendar options.
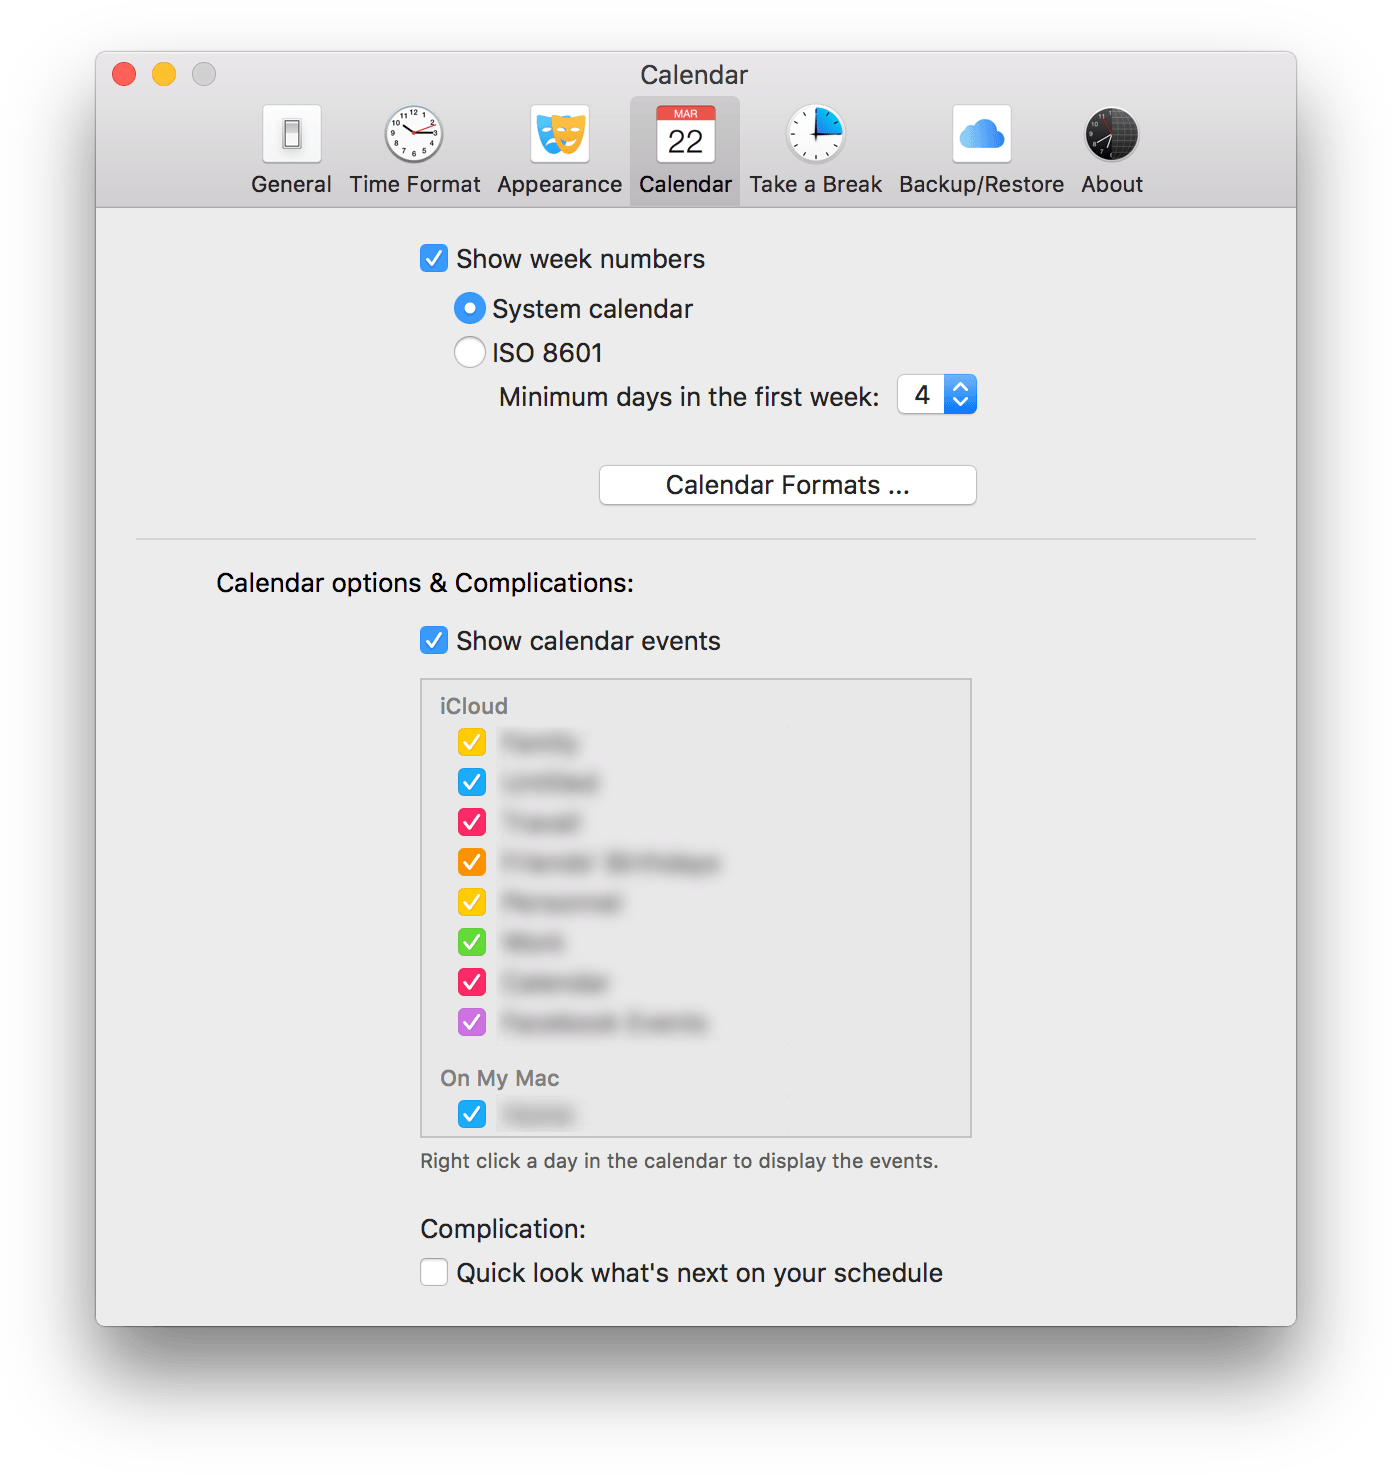
- Hide or not the week numbers.
- Choose your calendar week method of reference.
- Quick access to the system date formats.
- The Clock use your system settings for:
- The date format.
- The first day of the week.
- The calendar type.
- The Clock use your system settings for:
- Show/Hide calendar events
- Select the calendars to be synched by The Clock.
- Show/Hide the Calendar complication.
SHORTCUT
⇧⌘C Show/Hide the Calendar.
Select a Date
The Clock lets you select a date for 3 features:
- Left click button selection
- Enter/Remove holidays of a contact.
- Select a date for the Meeting Planner.
- Right click button selection
- Show the calendar events for the selected date.
Enter/Remove Holidays
For each world clock you can define the holidays for your contacts.
This days off are used in 2 places:
- For the Business Hours feature. All the hours of this day are considered as “Do Not Disturb”.
- For the highlight days off feature.
To edit/remove holidays, right click on a world clock to open the city preferences. Then select the Days off tab.
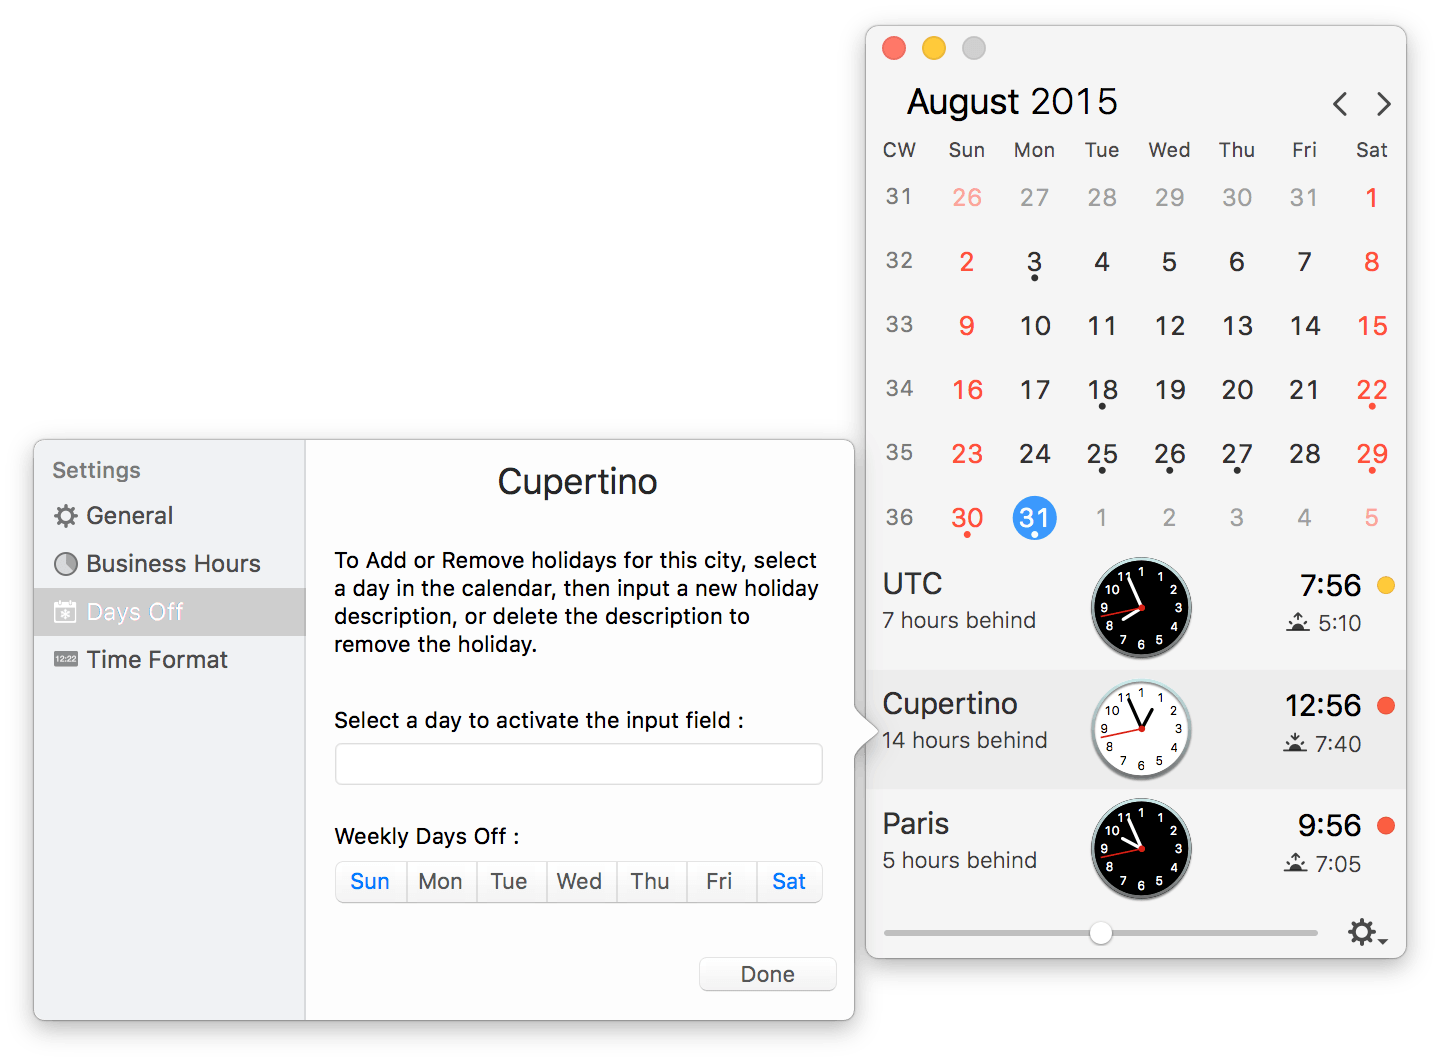
Then select a date in the calendar and input or remove a holiday.
NOTE VOICEOVER
Enter/Remove Holidays feature is not available with VoiceOver yet.
Select a Date for Meeting Planner
While the Meeting Planner is shown, just click on any date. If the Meeting Planner is not activated, just press ⌥ while selecting a date will activate the Meeting Planner at the selected date.
Selecting a date while using the meeting planner, ensure the daylight saving status for the selected date.
NOTE
⌘⇧T : To show the Go to Date panel.
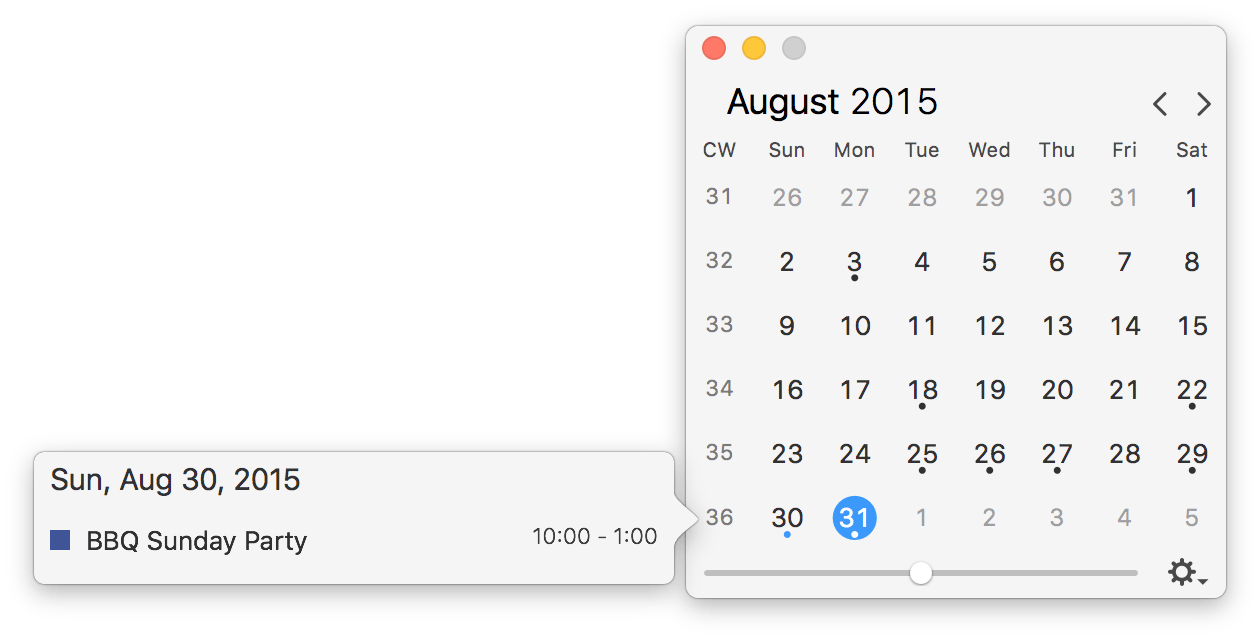
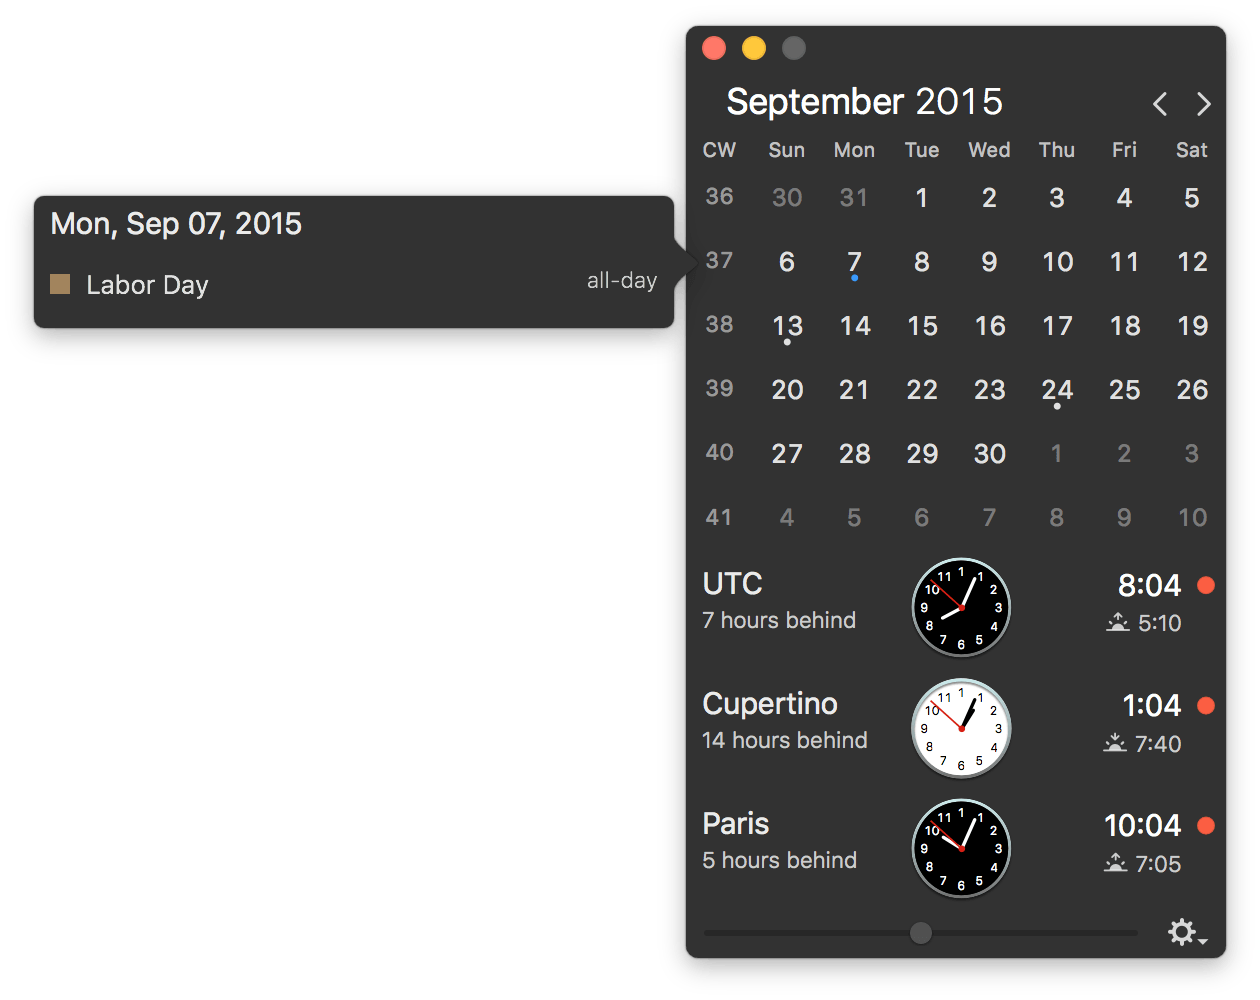
Show the calendar events
If you have choosen to show the calendar events in The Clock calendar, you can then display your calendar appointments by right click on a date.
As of The Clock 3, the events are synchronized with Calendar.app
NOTE
From 3.1, click on an event to open the system Calendar.
Highlight Days off
By default, the highlight is not activated. Because the highlight is linked to a world clock. To activate the week-end and days off highlight, right click on a world clock to open the city preferences.
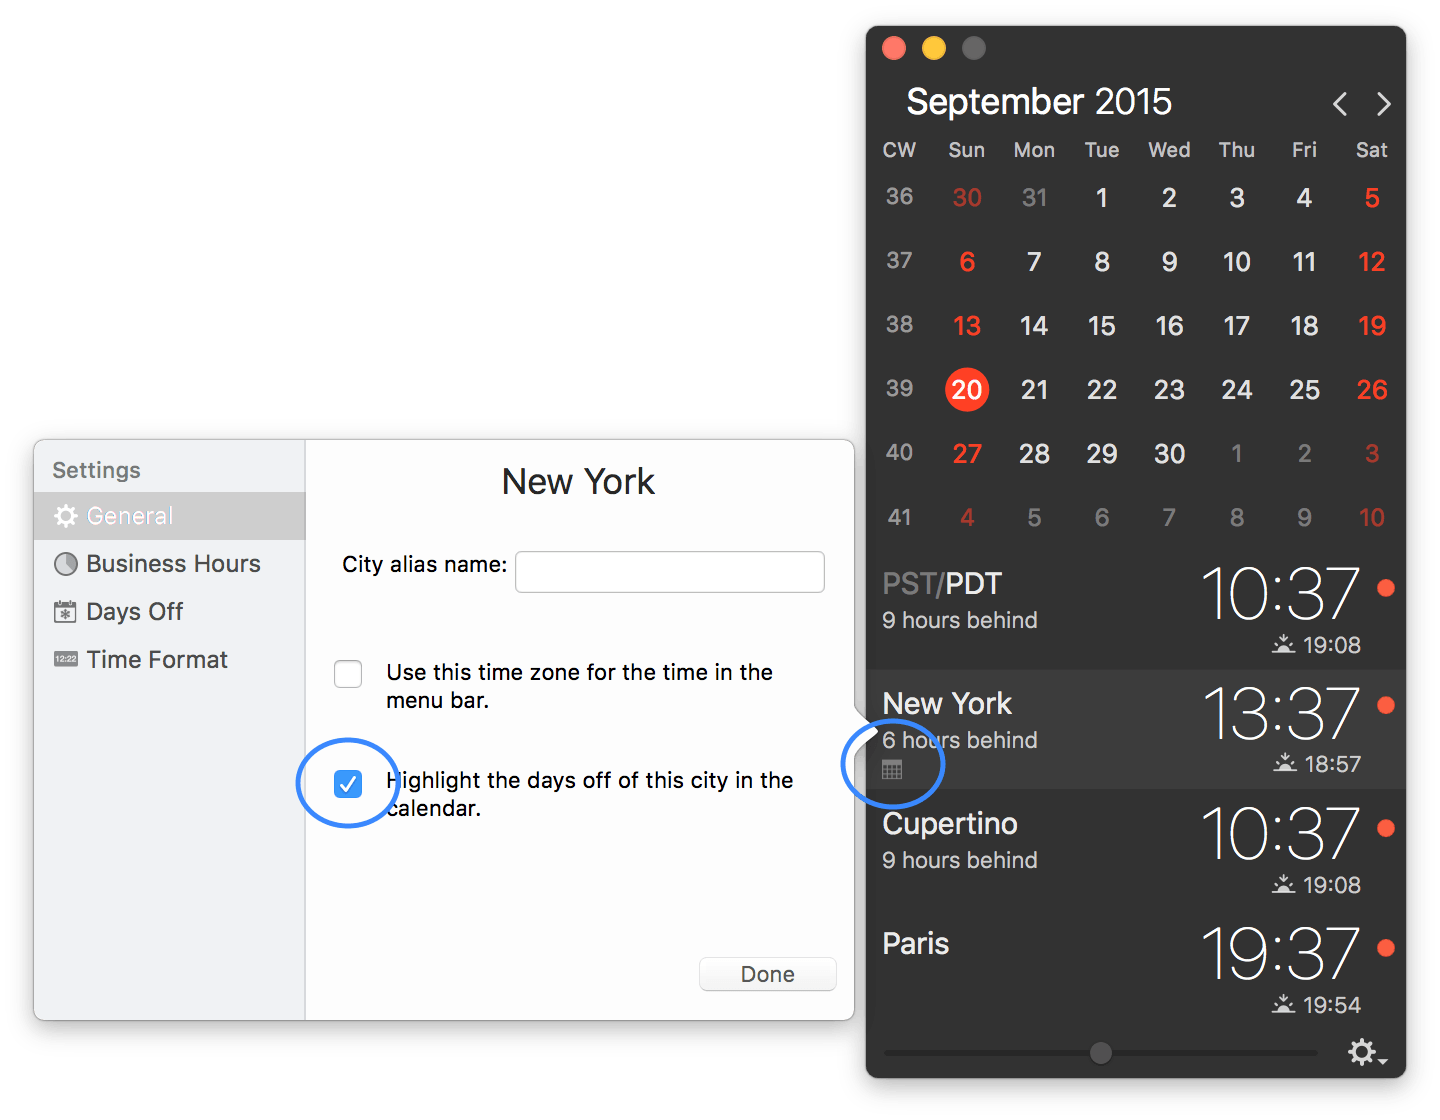
Then check the “highlight days off in the calendar” from the city preferences.
NOTE
When activated a little calendar icon will be added to the world clock, to always remind you from which city come from the highlight.
Business Hours
The Business Hours feature is a very useful complication for your world clocks.
| Business Hours | Customize the Business Hours |
| Customize the week-end and days off |
Business Hours
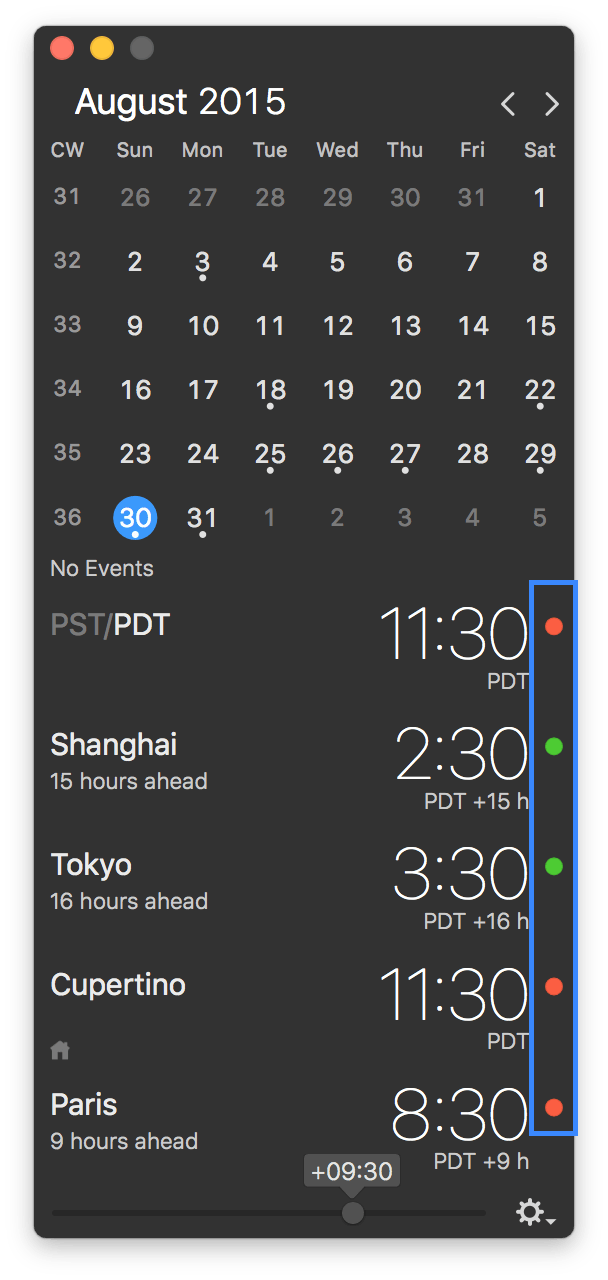
What is the Business Hours complication?
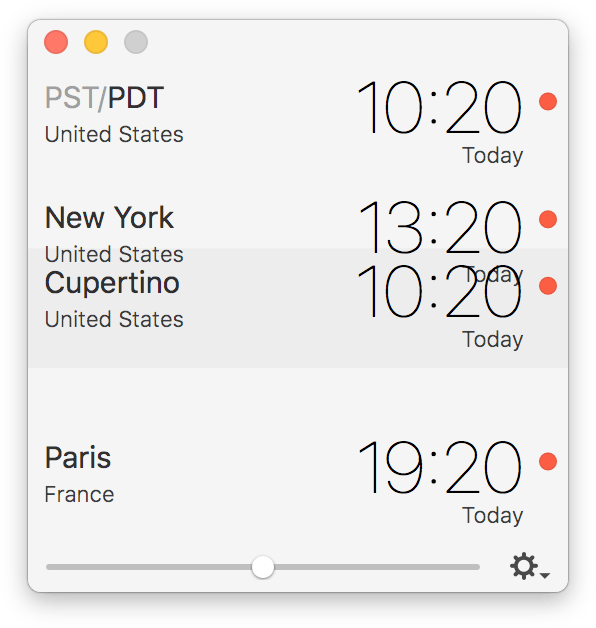
After activating the complication from the Preferences, you will notice that some color led appear on the right side of all the world clocks. These led tell you when is the best time to contact your collegues, friends and family.
The color code is as follow:
- Red: Do Not Disturb
- Ember: Outside Business Hours
- Green: Business Hours
The color change per city according to:
- The time range defined in the world clock preferences
- The defined week-end days
- The defined holidays
Customize the Business Hours
The default Business Hours settings is depending on the city, and come from The Clock database. If you wish to modify them, right click on a city to access the city preferences.
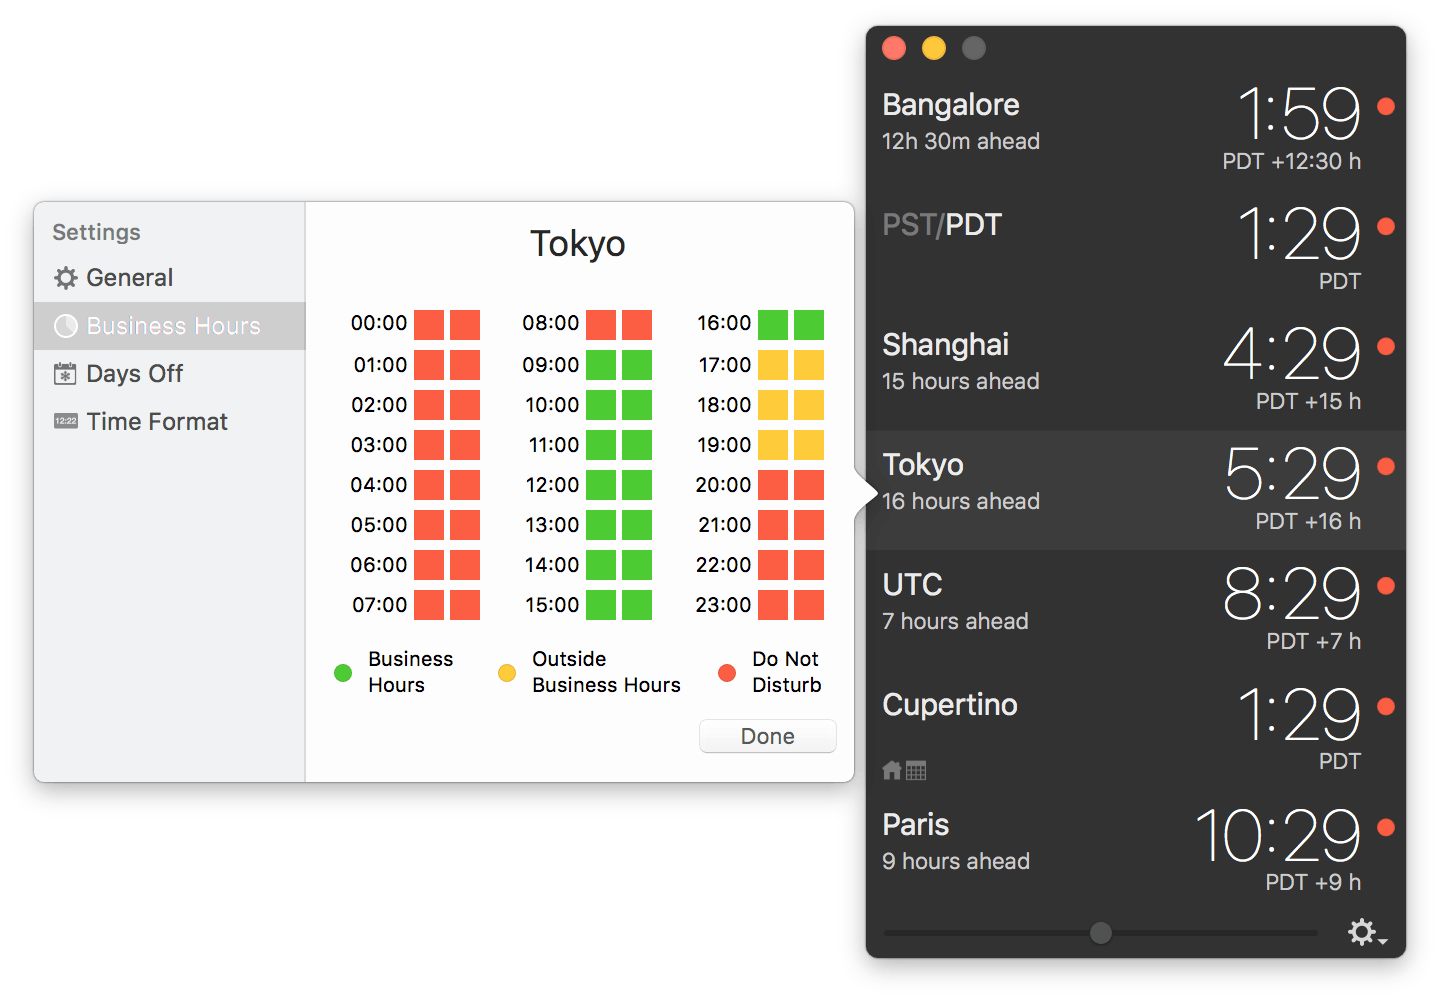
Select the Business Hours tab. Click on the color square to adjust if the half hour is a worked or not.
Customize the week-end and days off
Select the Days off tab
- Define the weekly days off.
- Define holidays for your contact. (see The Calendar section).
Meeting Planner
Meeting Planner feature in The Clock will boost your productivity by helping you to plan your meeting quickly.
| Overview | The Calendar |
| The Meeting Planner Slider | The Business Hours |
| Complication | Copy/Paste your meeting information |
Overview
While using the Meeting Planner feature many areas of The Clock are useful
- The Meeting Planner Slider
- The Calendar
- The World clocks
- The calendar complication
- Copy/Paste, Share your meeting information
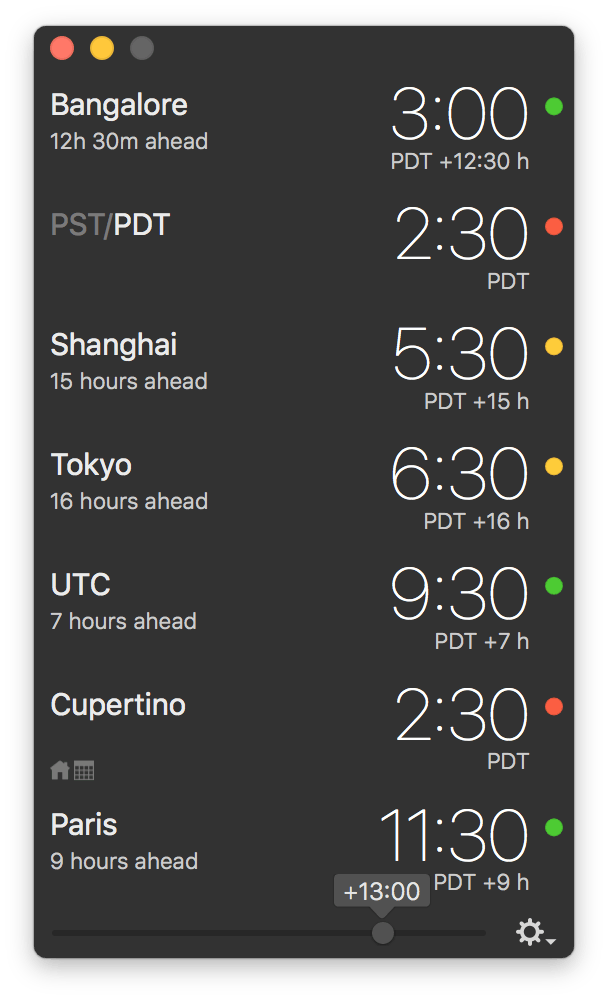
To plan your meeting, just drag the slider left/right, or swipe above your world clocks. This will automatically change the time in the world clocks and in your menu bar. The Business Hours color led will automatically adjust.
You can as well select a date. This will ensure that the Daylight Saving time offset is accurate for the selected date.
The Meeting Planner Slider
To activate the Meeting Planner slider click on the gear icon to access the menu, and select the menu item Show Meeting Slider.
SHORTCUTS
⌥B or ⌘B : Show/Hide Meeting Planner slider.
The Meeting Planner slider can be adjusted from –24h/+24h.
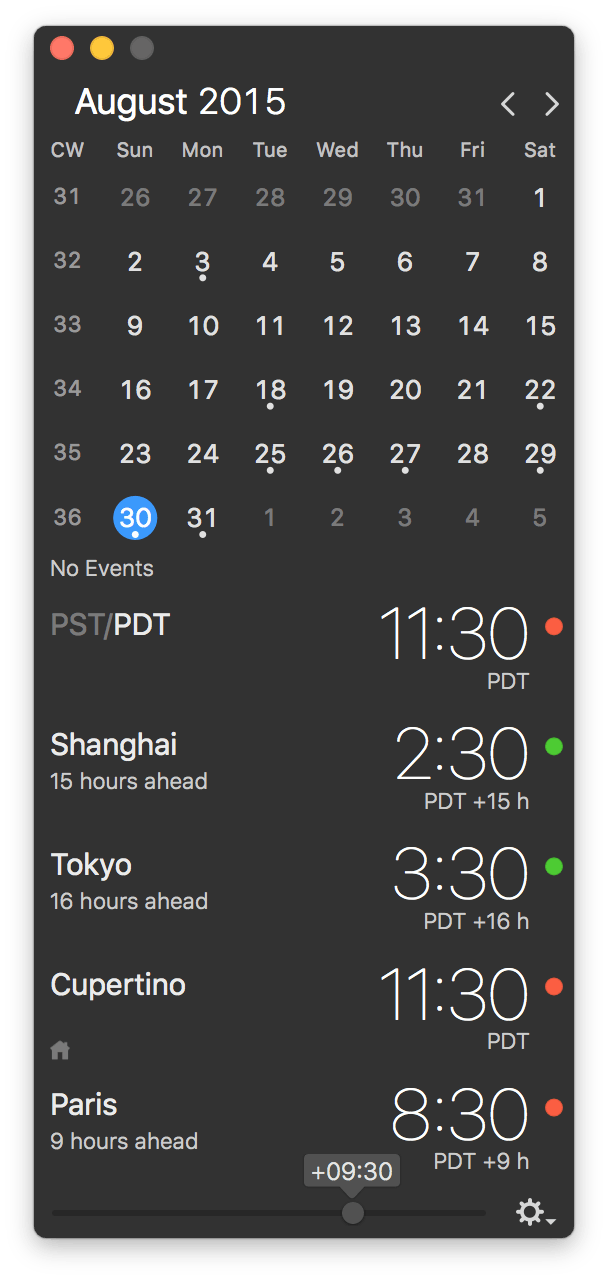
The world clock time, and menu bar time will automatically update with the offset applied. The time is automatically rounded to 15min, for better readibility.
NOTE
Press the ⇧ while sliding, will round the time in the world clocks and menu bar to 30 min. Double click on the Meeting Planner slider will reset the offset to 0.
Double tap above your world clocks will reset the offset to 0.Make sure that the slider is back to 0 to get the current time back.
It will automatically be reset to 0, if you close the window.
| Shortcut | Action |
|---|---|
| ⌥B or ⌘B | Show/Hide Meeting Planner slider. |
| ⌥R | Reset Meeting Planner slider to 0h. |
| ⌥Left/⌥Right | Decrement/Increment the slider of 15 min. |
| ⌥⇧Left/⌥⇧Right | Decrement/Increment the slider of 30 min. |
The Calendar
You can select a date in the calendar to ensure that the time calculated is taking the right Daylight Saving offset for the selected date.
To select a date for the Meeting Planner, the slider must be visible. If the Meeting Planner slider is not visible, activate it as described previously. Or press ⌥ while clicking on a date. This will select a date and activate the Meeting Planner Slider.
| Shortcut | Action |
|---|---|
| ⇧Left/⇧Right | Previous/Next day in the Meeting Planner calendar. |
| ⇧Up/⇧Down | Previous/Next week in the Meeting Planner calendar. |
The Business Hours
If you have activated the Business Hours complication from the preferences, you will have color led on the right side of each world clocks. This led inform you if your contact is supposed to work or not.
These led automatically adjust their color status while you are dragging the Meeting Planner slider.
To know more about The Business Hours feature, how to adjust the working hours of your contact, go to the Business Hours section.
The Calendar complication
If you have activated the Calendar events to be synched with the system Calendar, and activated the Calendar complication.
You will then know immediatly if you have something already planned.
Copy/Paste your meeting information
Once you found the best time for your meeting, you can easily extract the information to be included in an email, for example.
If the Meeting Planner slider is not at 0:
- Select the cities you want to get. The left side will be highlighted.
- Right click above the world clocks area to copy or share the information of all the cities at once.
NOTE
⌘A to select or deselect all the cities. (The Clock 3.1)
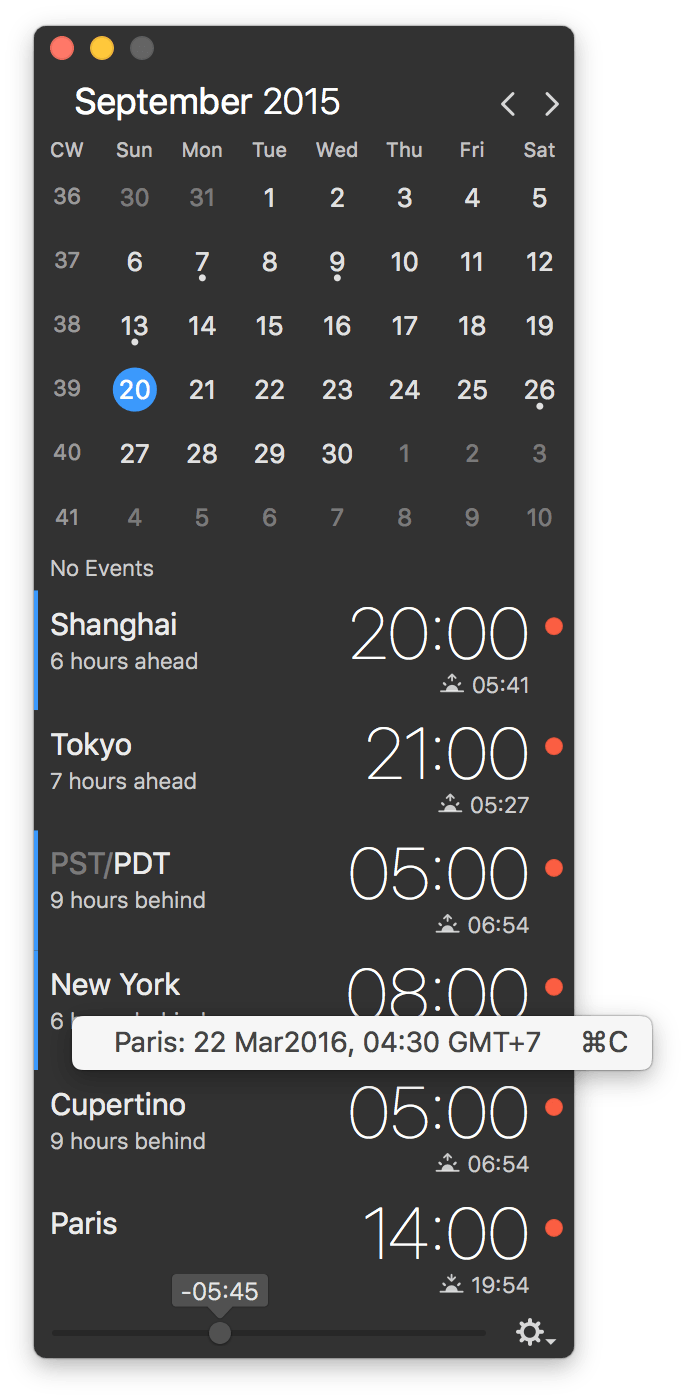
The menu to copy the date/time information is based on your own format. To define the formats, go to the Preferences.
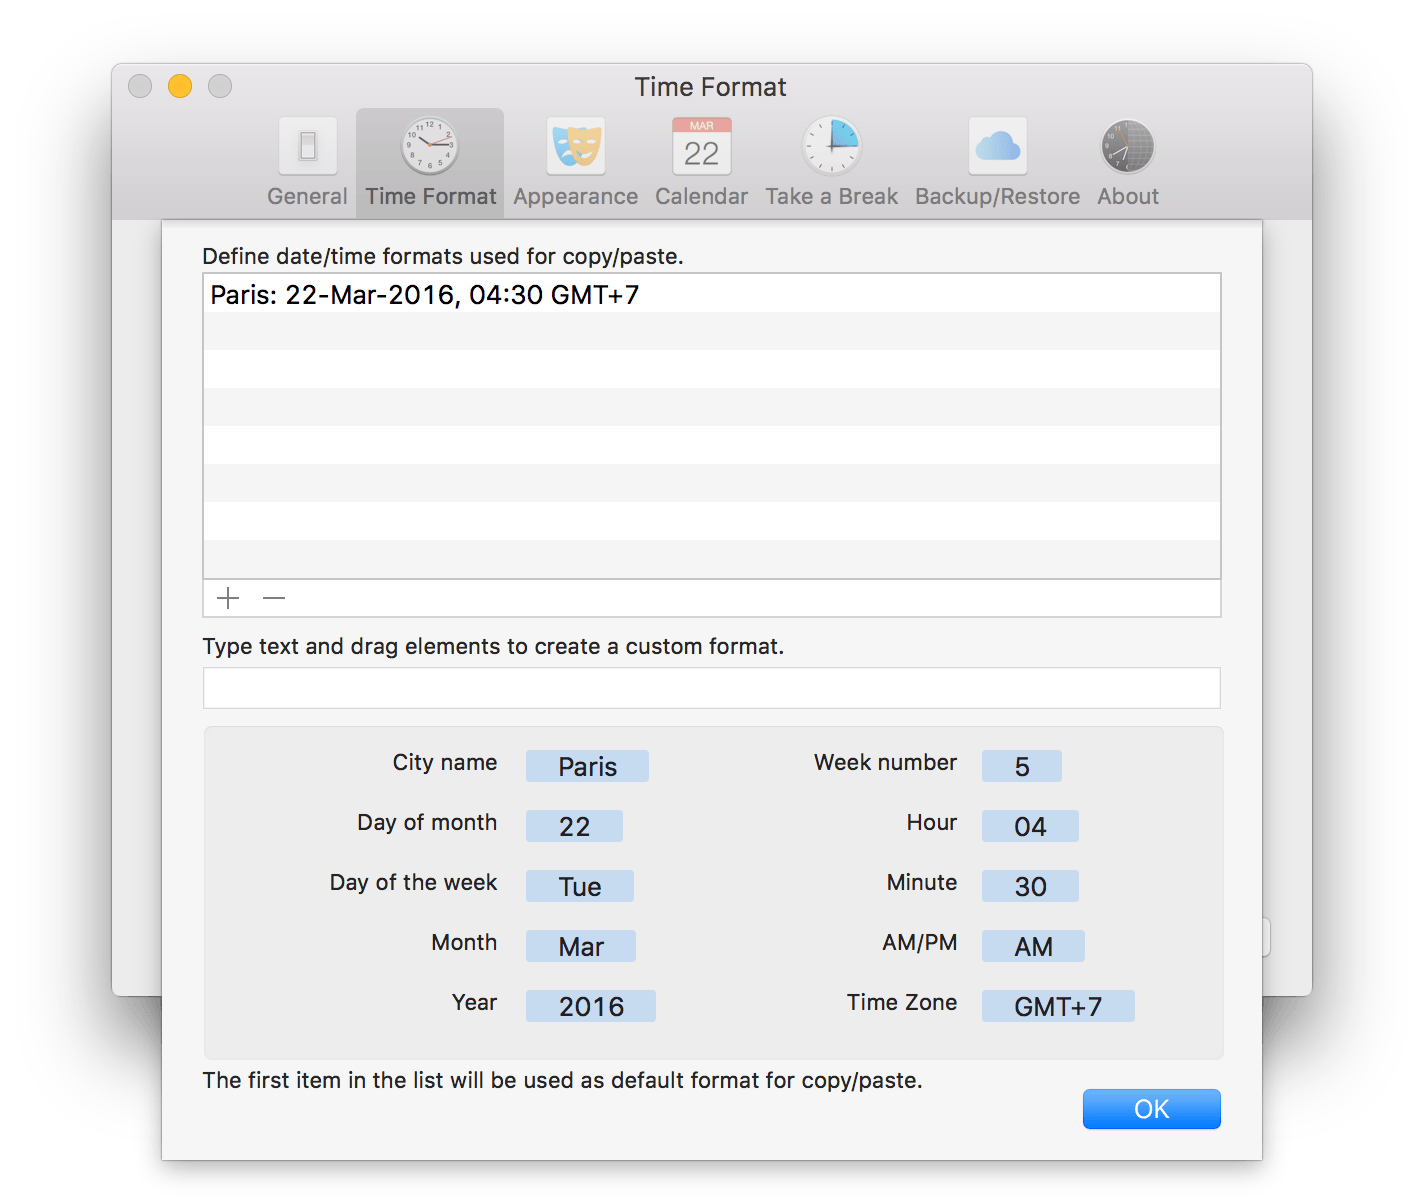
Define as many different custom formats as you need.
The Menu Bar Items
This section will show you how to customize your menu bar item.
| Time & Date Format | Add Date information |
| Change Time Zone | Add Take a Break |
| Item Highlight | Add moon phase |
| Move the items | Move The Clock |
Time & Date Format
You can adjust the time format from the Preferences, in the Time Format tab.
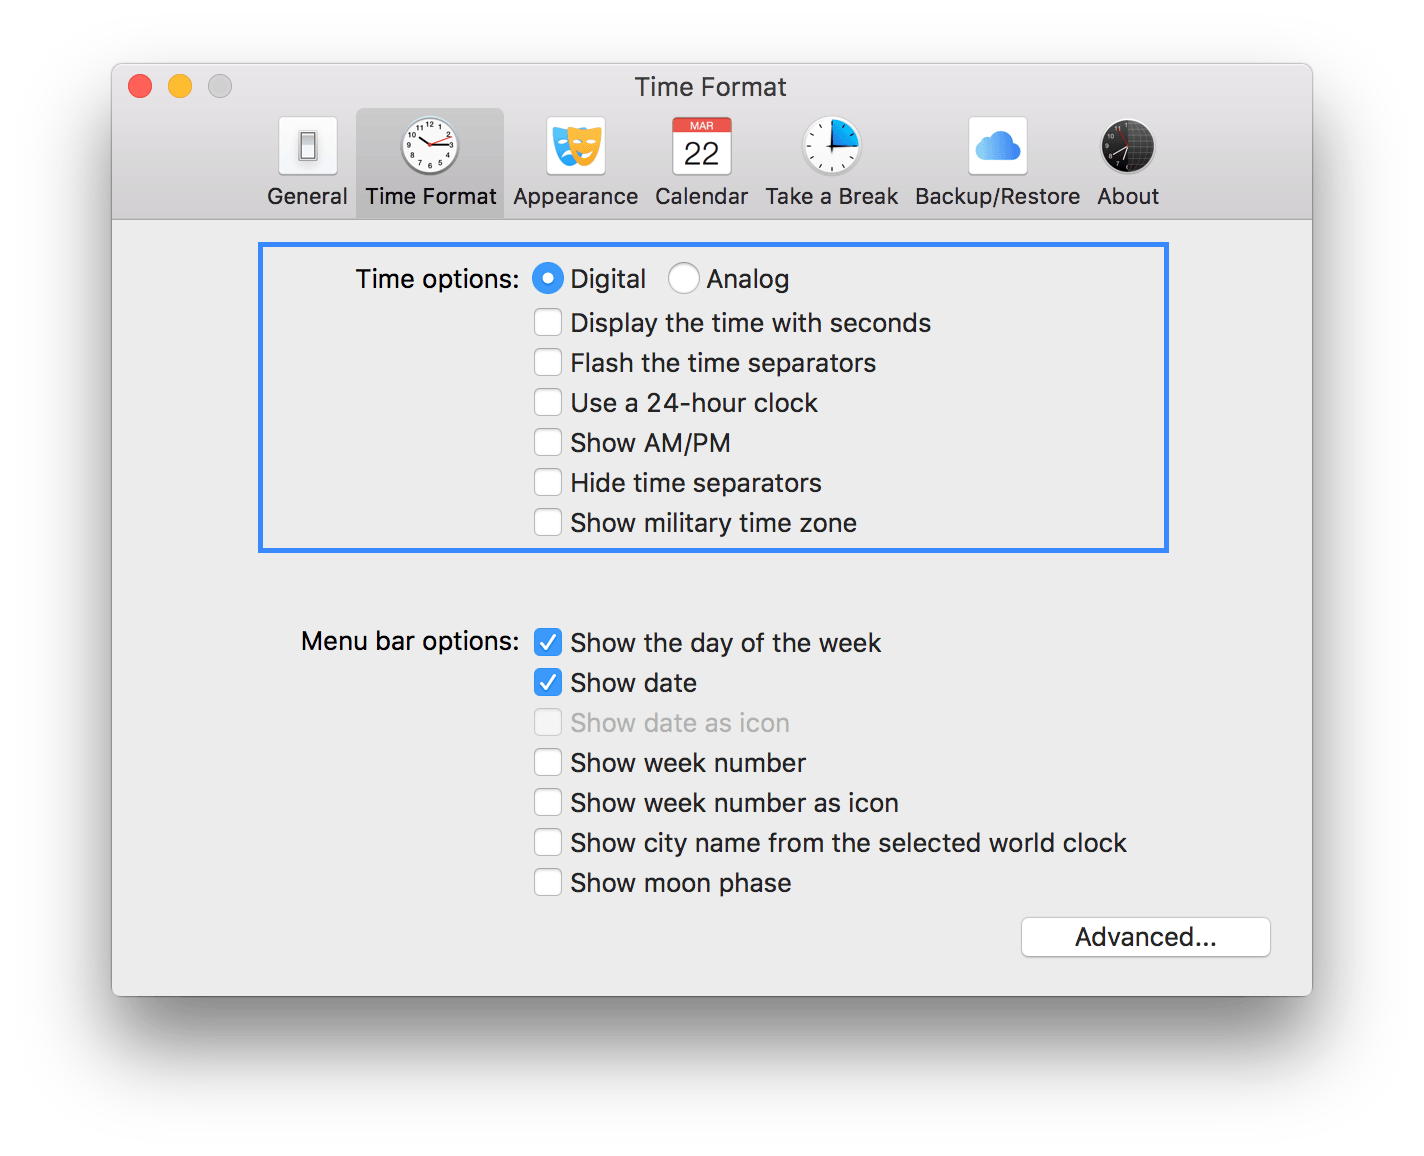
Choose the time format you wish.
Choose if you want to see the time as digital or analog.
NOTE
The Clock follow the date format defined in the System Preferences.
Change Time Zone
You can change the time zone of the time displayed in the menu bar. For this, right click on a world clock.
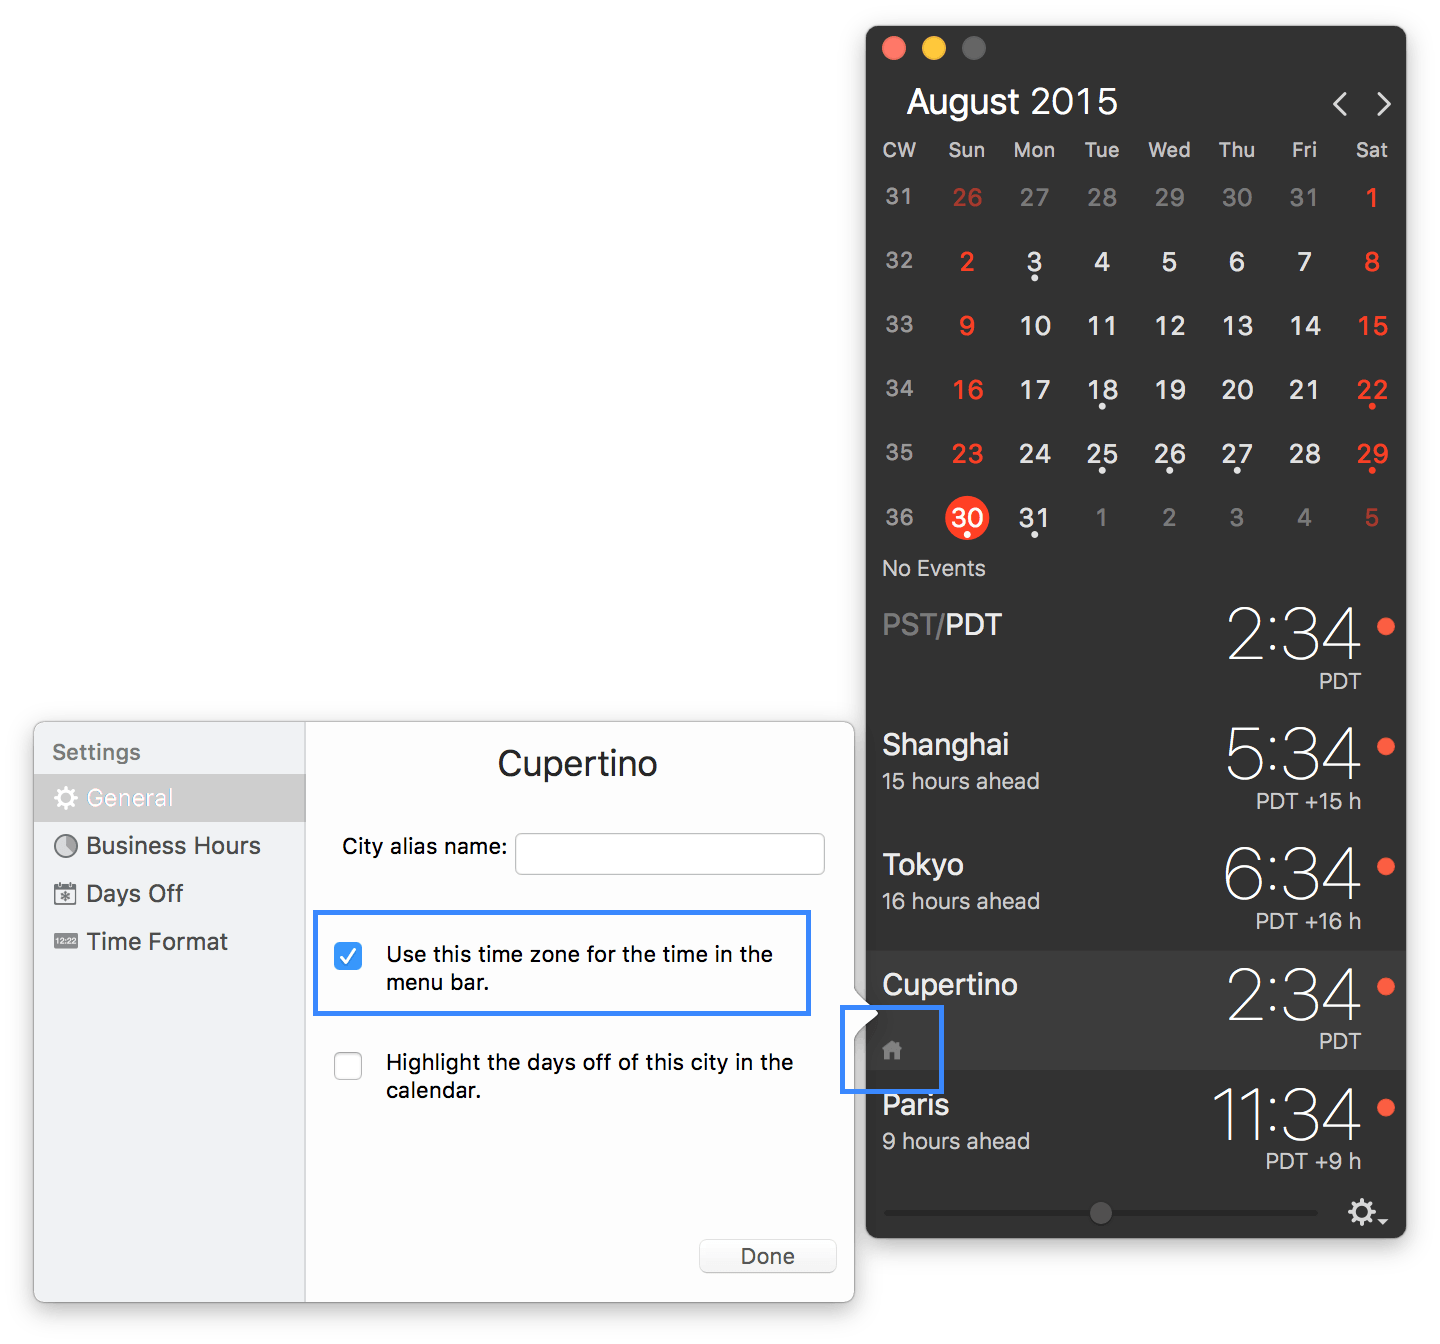
Then check “Use this time zone for the time in the menu bar”. A home icon will appear in the world clock to show that the time zone in the menu bar is linked to this one.
NOTE
You can show the city name in the menu bar. Go to the Preferences, tab Time Format and activate the option.
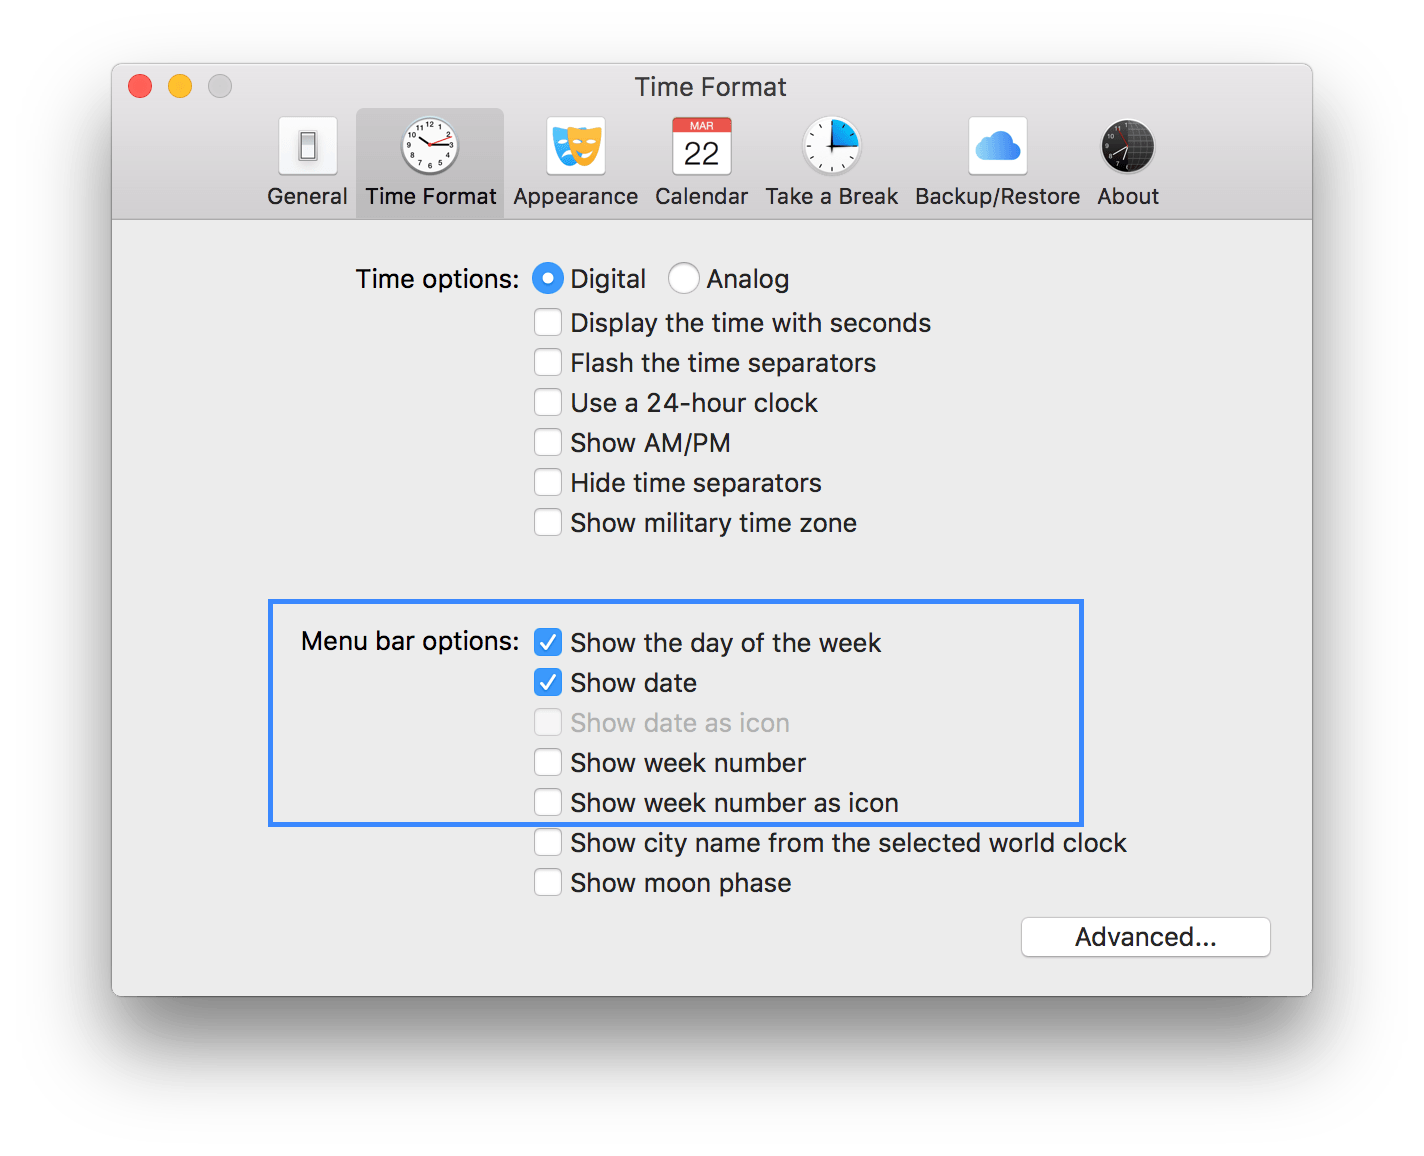
Add Date information
You can add date information by selecting the option in the Preferences.
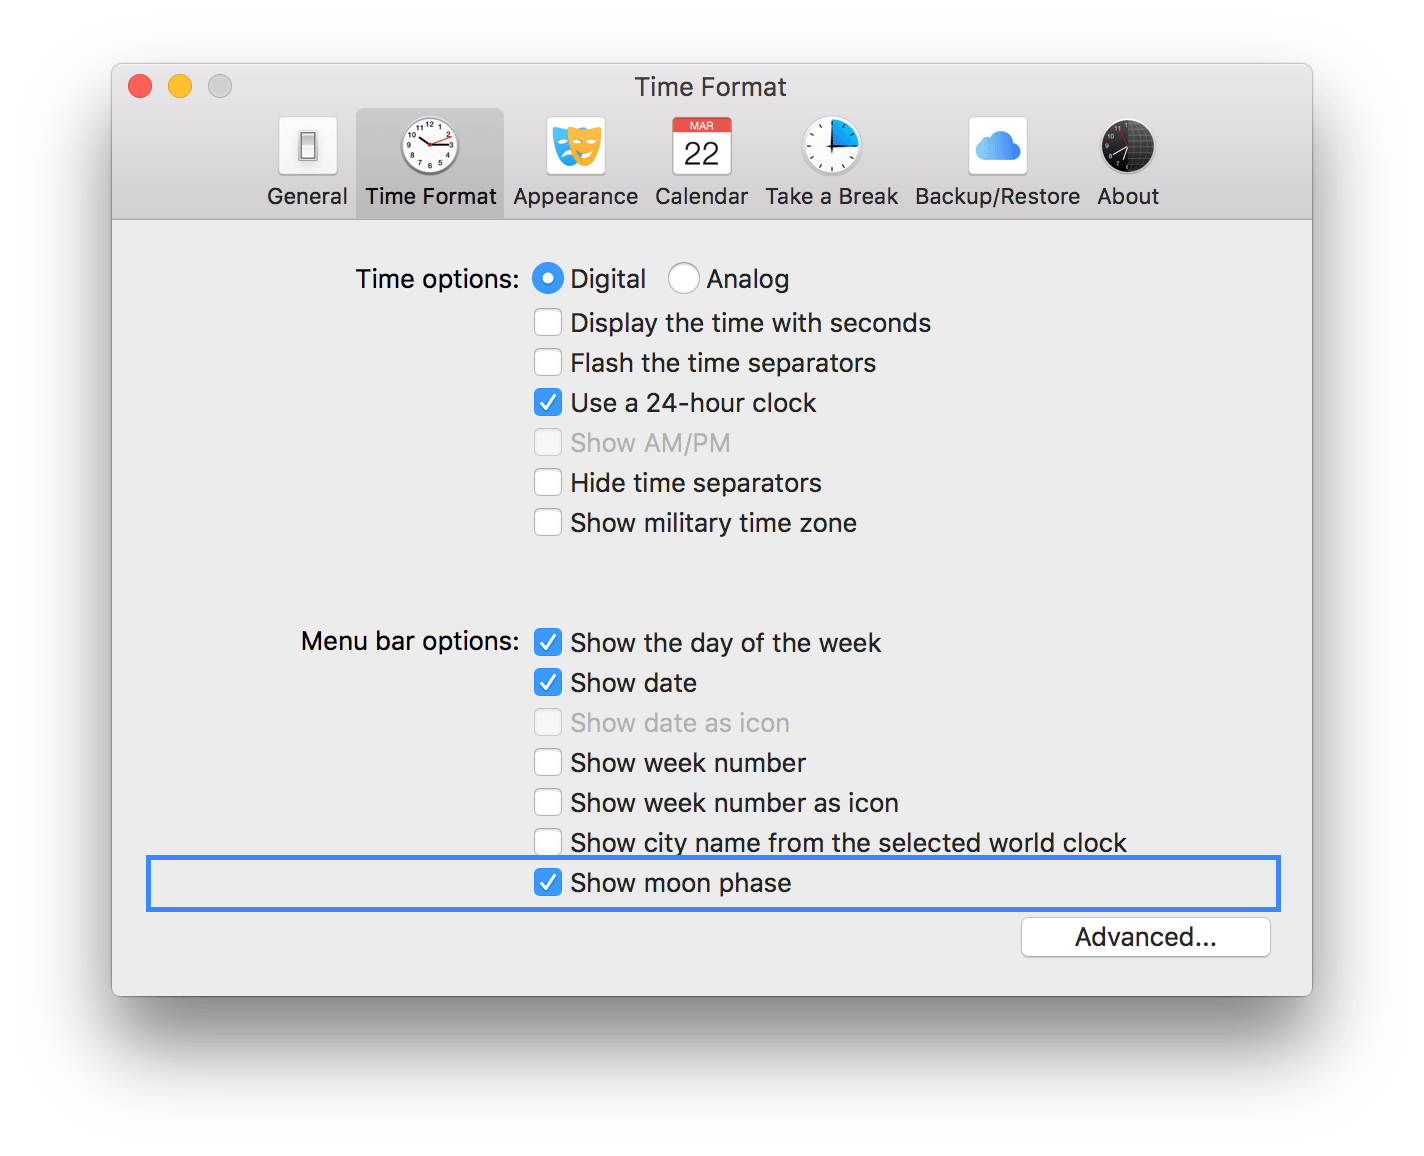
Add Moon Phase
You can show the moon phase icon information by selecting the option in the Preferences.
To get more information about the moon, select the menu bar item, and move your mouse above the moon icon to display the tooltip.
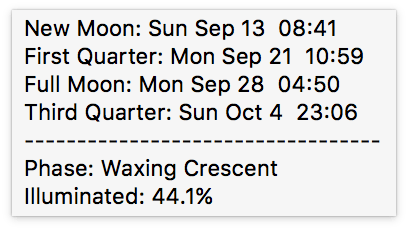
NOTE
You can see how was the moon illumination at a different date or time. Simply change the date/time by using the Meeting Planner feature.
From The Clock 3.1, you can invert the moon illumination color from the Preferences Appearance tab.
Add Take a Break
You can activate the Take a Break timer by activating the option from the menu.
You can choose or not to display the timer in the menu bar, and more options in the Preferences.
Item Highlight
Depending on how you are using The Clock, you may wish to not always highlight the background item in blue, but some time only the text or not at all. The option is available from the Preferences.
Move the items
The menu item is composed of independant sub-items.
- Digital Clock
- Analog Clock
- Date Icon
- Moon Phase
- Week Icon
- Take a Break Icon
You can re-arrange the order of these sub-items by ⇧Drag & Drop the sub-item in the menu bar.
Move The Clock
If you wish to place easily The Clock menu bar item anywhere in your menu bar, please visit the seense website, where a free add-on is available.
Take a Break
Always focus on your tasks, some time it is good to be remembered to Take a Break.
Take a Break
Take a Break timer is activated from the menu.
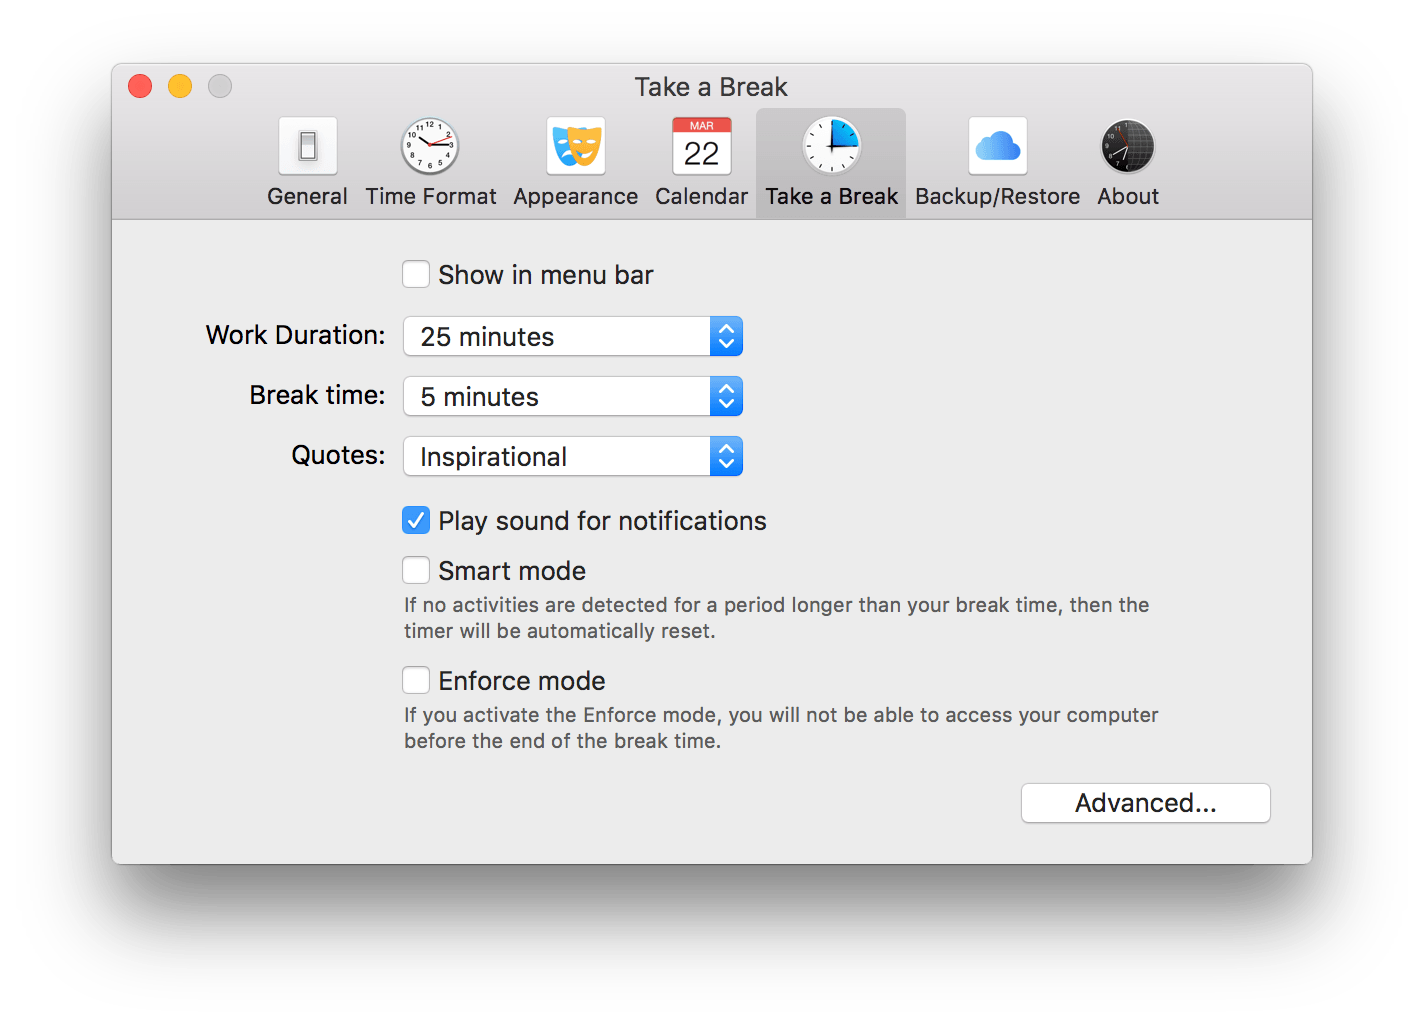
For more options go to the Preferences.
Go to the Preferences, in order to set your frequency work timer and your break time. You can choose to Show/Hide the progress timer in the menu bar. You can choose to enforce the break time.
Just few seconds before the desired work duration is reached, a little snooze panel will appear, for you to choose to take your break or to snooze it. When the time is up, your Desktop will be covered of a shield window during the time of your break.
NOTE
If you choose the enforce mode, you will be able to snooze only once. Then you will not be able to work until the Break time is completed. Useful for workaholics not able to Take a Break ;)SHORTCUTS
⌘N : Reset Take a Break timer.
Backup & Restore
You are getting a new Mac, or simply doing a clean install of your system. The Clock lets you Backup & Restore your configuration settings. Quickly get back to be productive.
Backup & Restore
Access the feature from The Clock menu (click on the gear icon), or directly from the Preferences.
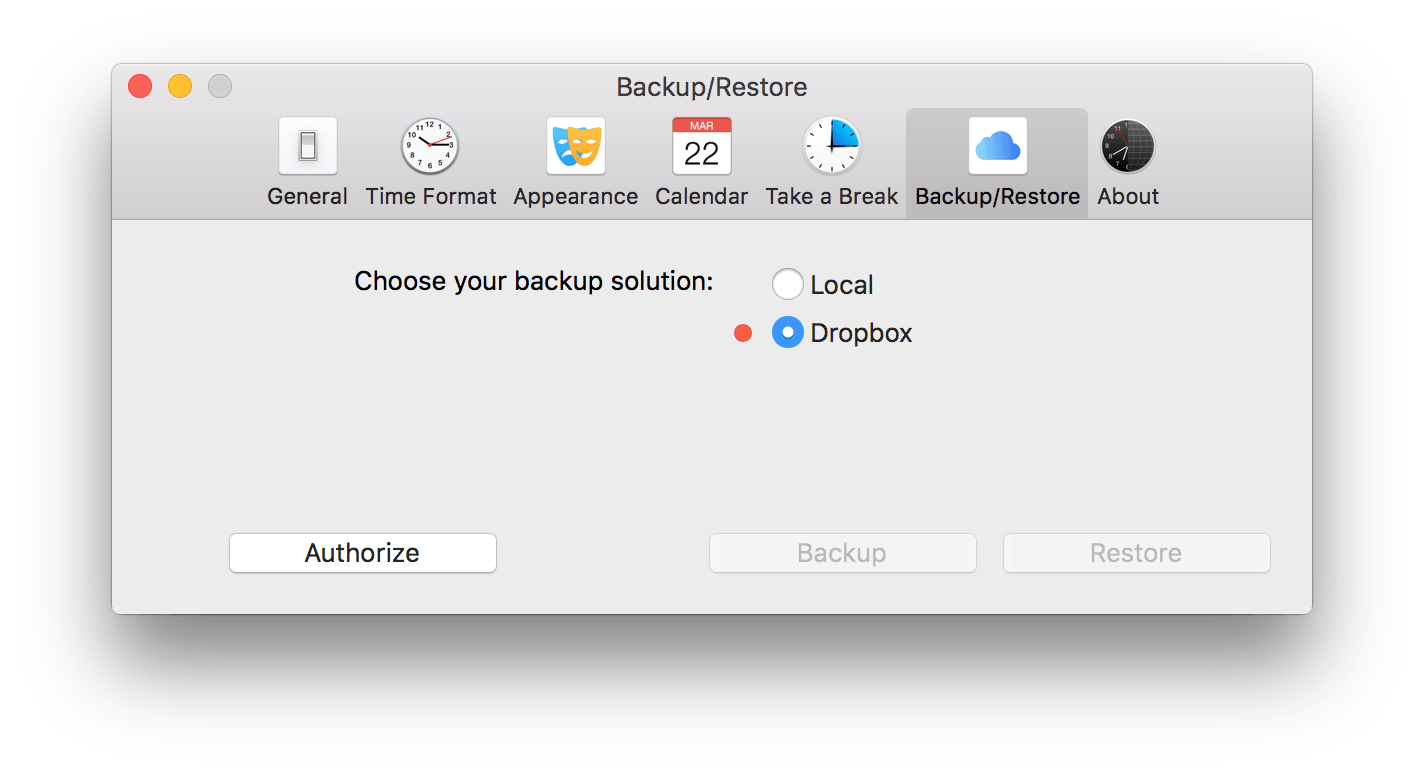
Select your backup/restore mode:
- Local
- Dropbox
Local
Backup: Click on the Backup button and select where you want to save the backup file.
Restore: Click on the Restore button and select a backup file.
NOTE
After a restore, The Clock will restart with the new configuration.
Dropbox
Authorize: If not yet authorized, click on the Authorize button. The Clock will guide you through the authoriztion steps to authorize The Clock to access your Dropbox.
Backup: Click on the Backup button. A date of last backup will be displayed.
Restore: Click on the restore button. (If not authorized, then you must authorize first).
NOTE
After a restore, The Clock will restart with the new configuration.
Keyboard Shortcuts
If you are a keyboard shortcuts nuts as I’m, you will find out that many actions can be performed from the keyboard. Hereby is the full list of all the keyboard shortcuts available for The Clock.
| Global | World Clock |
| Calendar | Take a Break |
| Meeting Planner | Other |
Global
You can define a global keyboard shortcut to open and close The Clock window.
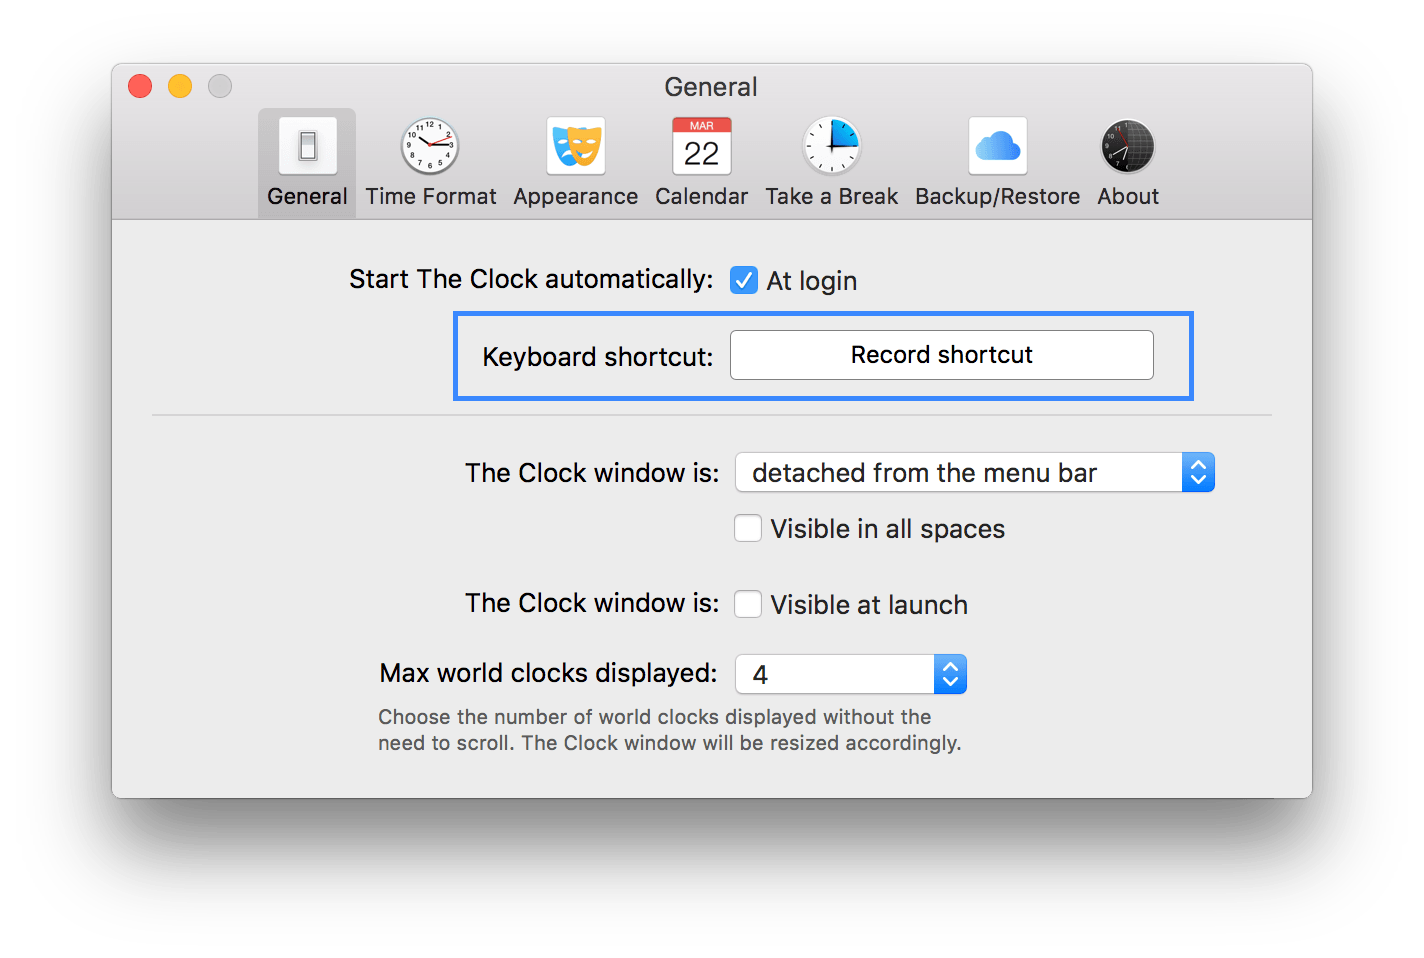
World Clock
| Shortcut | Action |
|---|---|
| ⌘N | Add a new world clock. |
| ⌘D | Show/Hide the world clock delete mode. |
| ⌘C | Copy date/time information, while meeting planner used. |
| ⌘A | Select/Deselect all world clocks, while meeting planner used. |
Calendar
| Shortcut | Action |
|---|---|
| ⇧⌘C | Show/Hide the calendar. |
| ⌘T | Go back to today month. |
| Left/Right | Go to Previous/Next month. |
| Up/Down | Go to Previous Quarter/Next Quarter. |
| ⇧⌘T | Go to Date panel. |
NOTE
Swipe your trackpad Left/Right to go to the Previous/Next month.NOTE VOICEOVER
While using VoiceOver, use ⌘[ or ⌘] to Go to Previous/Next month.
Take a Break
| Shortcut | Action |
|---|---|
| ⌘P | Activate/Deactivate Tabe a Break timer. |
| ⌘R | Reset Take a Break timer. |
Meeting Planner
Many keyboard shortcuts are available for the Meeting Planner feature. Most of them use the ⌥ key (option/alt).
| Shortcut | Action |
|---|---|
| ⌥B or ⌘B | Show/Hide Meeting Planner slider. |
| ⌥R | Reset Meeting Planner slider to 0h. |
| ⌥Left/⌥Right | Decrement/Increment the slider of 15 min. |
| ⌥⇧Left/⌥⇧Right | Decrement/Increment the slider of 30 min. |
| ⇧Left/⇧Right | Previous/Next day in the Meeting Planner calendar. |
| ⇧Up/⇧Down | Previous/Next week in the Meeting Planner calendar. |
NOTE VOICEOVER
While using VoiceOver, it is recommended to use the above shorcuts (more precise) and not the VO shortcuts. These shortcuts are accessible from anywhere in The Clock window.
Other
| Shortcut | Action |
|---|---|
| ⌃⌘A | Activate/Deactivate Floating window mode.. |
| ⌘, | Preferences. |
| ⌘Q | Quit The Clock. |
| ESC | Escape a window, panel, control… |